How do I map my P: drive in Windows?
Before You Begin
Mapping the P: drive is important when it is necessary to access, save, and share project files. Computers on campus connected to the Wolftech domain map the drive automatically. Those not on the domain will have to map the drive manually. This page will outline the basic steps on how to do this.
When using Windows to map the drive, it will be necessary have the university's VPN client software installed and running on the machine beforehand. If you plan on mapping the P: drive frequently, or having Windows map the drive automatically each time you log on, you should configure the settings of the VPN client such that it will run immediately after logging in. This will ensure that the drive maps successfully.
Mapping the P: Drive
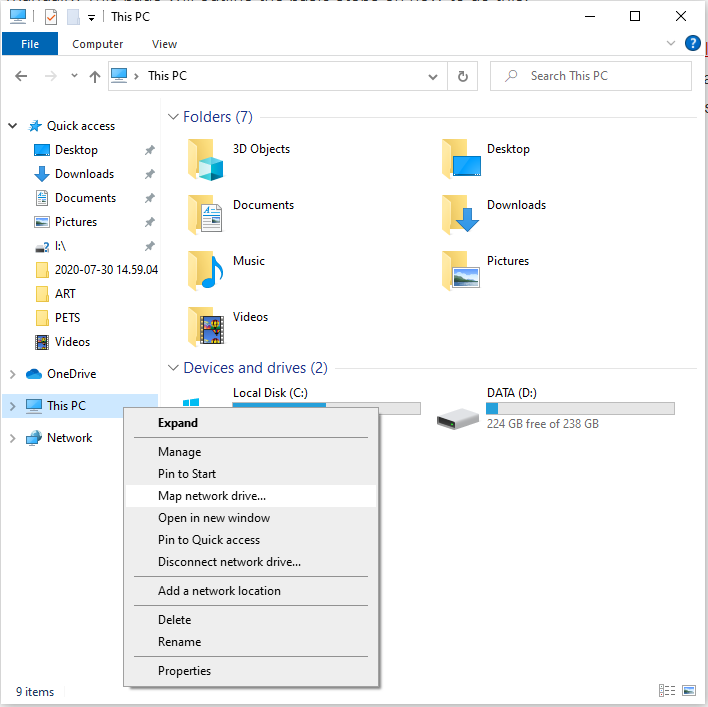
Fig. 1
To map your P: drive, click on File Explorer (the manilla folder icon), and right-click on This PC. Then, select Map network drive from the drop-down menu (Fig. 1).
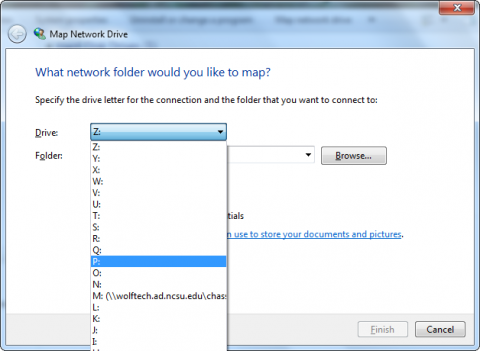
Fig. 2
When the "Map Network Drive" window appears (Fig. 2), click on the drop-down menu next to Drive, and select P:.
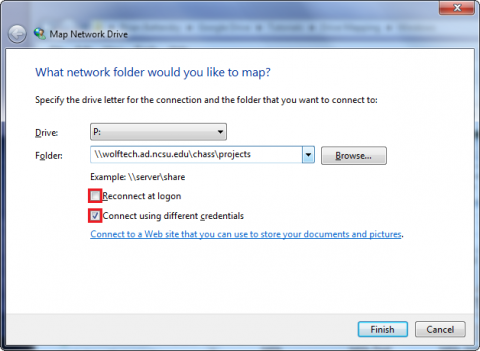
Fig. 3
In the text box next to Folder, you can type in the server path for the mapped drive (Fig. 3). In this case, \\wolftech.ad.ncsu.edu\chass\projects.
It is recommended that you leave Reconnect at logon deselected. If you decide to have Windows re-map the drives upon logon, you may encounter an error message. You will want to make sure that the VPN client is sent to run automatically, and that you enter in your UNITY ID and password. Once the client makes a successful connection with the server, another attempt to connect to the previously mapped drives can be made.
Then, select Connect using different credentials, which will prompt you to enter your Unity ID and password rather than using that of your local machine's user account. If this option is NOT selected, Windows will attempt to map the drives using the account credentials of your local machine rather than your Unity ID and password. If this occurs five times in succession, it will result in your account being locked out.
To initiate the connection, click Finish.
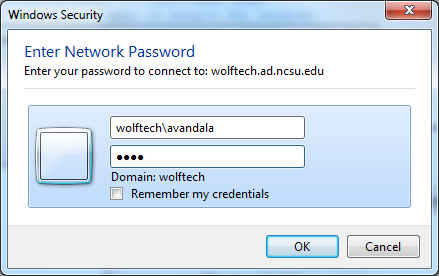
Fig. 4
If you have already mapped the P: drive, and have entered your Unity ID and Password, you will only be prompted to enter in your password. In case you haven't, the figure above (Fig. 4) also details how you would enter in your Unity ID. When doing so, you must first type wolftech\ and then enter your Unity ID after the final backslash.
It is important to leave Remember my credentials unchecked.
Click OK when finished.
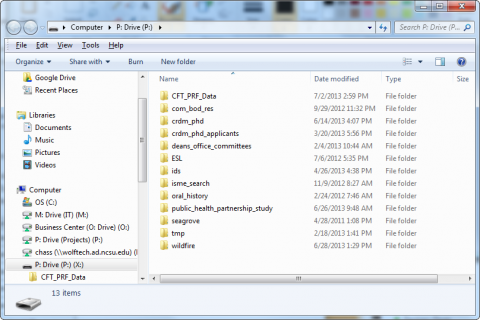
Fig. 5
Your P: drive should then be successfully mapped, appearing in its own separate window (Fig. 5).