How do I install a program using Self Service in Windows?
[Note: This page contains information on scheduling, which at the time of the writing of the FAQs page had not yet been implemented as official policy. If neccessary, this page can be used for addenda on the subject.]
CHASS IT now makes certain software applications available for self-service installation on Active Directory Domain Windows PCs (a computer that you log on to with your UNITY account credentials). The steps below will walk you through the process of installing software via this method.
How Self-Service Works
The self-service system uses the Software Center program. This program can be used in two distinct ways. You can either install or update programs manually whenever the need arises, or you can schedule your computer to perform installations and updates automatically during specified times. These instructions will cover both uses of the self-service system, since it is beneficial to use the Software Center in both ways.
Accessing the Software Center
To begin using the self-service system, you must first access the Software Center.

Fig. 1
To open the Software Center, first click on the Start button, and type "Software Center" into the search field. When the program appears in the search results, click on it to open it (Fig. 1).

Fig. 2
When the Software Center window appears (Fig. 2), you can use the drop-down menu under Show to either include all software packages or updates, Applications, Operating Systems, or only Updates.
Note. If you do not see the program among the list of available software packages, or you do not see any software packages at all, it may be that your computer has not yet synced with the server during its secheduled maintainence cycle. In order for your machine to do this, you must first tell the program when it can perform these cycles. To learn how, see Scheduling Updates below.
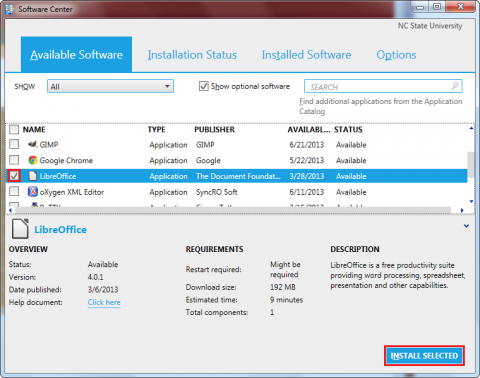
Fig. 3
Then, select the software package(s) that you would like to have installed, by selecting the check box next to the package name. When you have finished selecting, click on Install Selected at the bottom (Fig. 3). If the button is greyed out, it means that you will need special permissions to install the selected software.
The program will then move to the Installation Status tab, where the selected packages will be installed. You can view the status of the installation under the Status column.
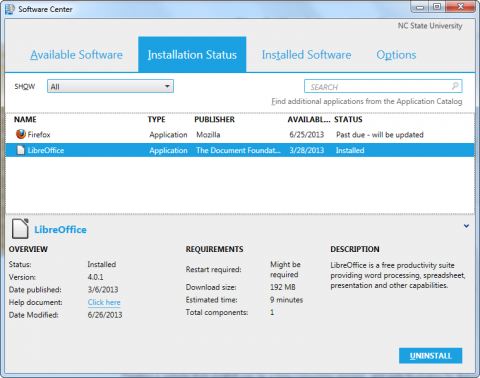
Fig. 4
Once the installation has been completed successfully, it will read Installed under the Status column (Fig. 4).
Installing Updates
Notice also that updates which are past due show up in the list together with the packages you have already selected. After selecting the update, you can either schedule the update for when you're not using the computer (by clicking Schedule), or click Install to begin the update right away.
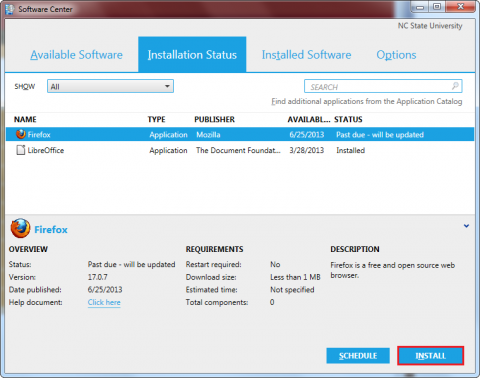
Fig. 5
For the purpose of this tutorial, we will select the update (in this case, Firefox), and click Install (Fig. 5).
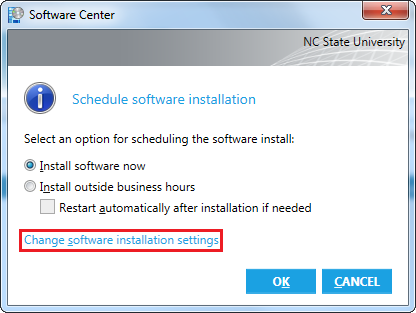
Fig. 6
A dialog box will appear, where you can choose whether to install the update immediately, or outside of business hours. If you want to install it immediately, select the Install software now option and click OK.
If you want the update to install while you're away from your computer, select the Install outside business hours option, clicking OK if you have already indicated to the program when you are normally away from your computer.
If you have not already entered your schedule into the program options, you will want to do so either from the window by clicking Change software installation settings, or after clicking OK by selecting the Options tab from the program's main window (see Fig. 7 below). For our purposes, we will click Change software installation settings, which will return us to the main Software Center window under the Options tab.
Scheduling Updates
After scheduling when you will be away from your desk, approximately every 4 hours or so, your machine will communicate with the server. It is important that during this time, your computer is logged off, but remains powered on for for a timespan between 4 to 12 hours.
By indicating to the program when your normal working hours are, the operating system will then perform system maintainence around your work schedule. Again, keep in mind that you have to remember to log out of your user account, but to leave the computer on in order for your machine to properly sync with the server.
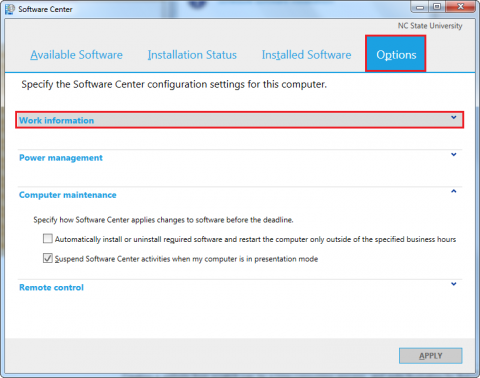
Fig. 7
To schedule when you will be out of the office, click on Work information from the Options tab (Fig 7).
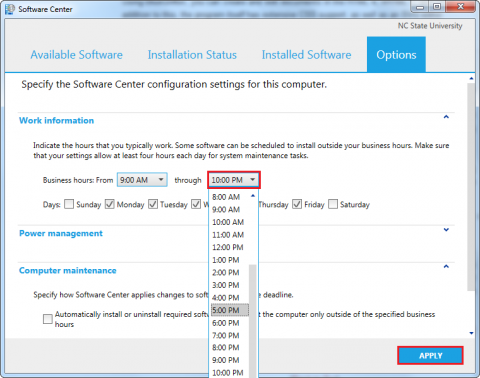
Fig. 8
Next, indicate the hours during which you are accustomed to work. The program will schedule maintainence cycles, updates, and server information requests around the timeframe you specify. The program automatically selects Monday through Friday, so if you have a normal work week, you can simply hit Apply after entering in your hours. If you are at your desk only on certain days of the work week, you can further specify these days as well (see Fig. 9 below).
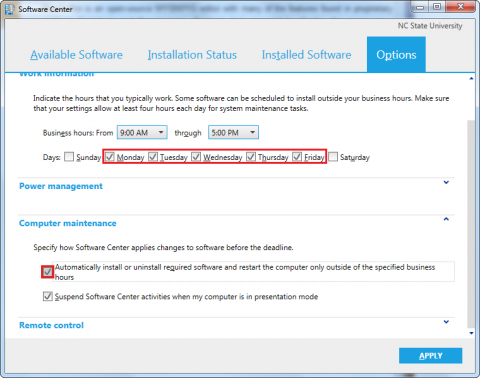
Fig. 9
If neccessary, you can also specify the days you are normally in the office, so that the program will schedule installations around your schedule. Under Computer maintenance, you can tell the machine to install or uninstall software automatically, restarting the machine only outside the hours you have specified (Fig. 9). When you have finished, click Apply.
Checking/Uninstalling Software
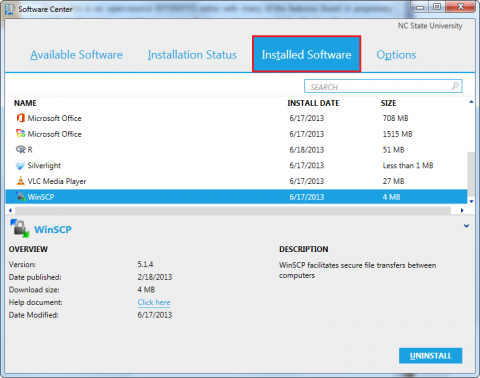
Fig. 10
To check to see if the software you wanted to add or update was installed correctly, click on the Installed Software tab. If you do not see your software package, then you may have to click on Available Software and (re)install it.
From this window, you can also uninstall software packages by selecting them, and clicking Uninstall.