The Newsletter Template
We offer two versions of the newsletter template, both with and without images. This template is designed to promote — via email — stories that are housed on the college’s website, a departmental site or another site with news or information that is interesting or useful to your specific audience (students, faculty, alumni, etc.). If you are interested in using this template and have not yet received access to the Humanities and Social Sciences Bronto account, please contact the college communication office and CHASS Web Development for more information.
Below are instructions for how to create and send an email message using the newsletter template in Bronto.
STEP 1:
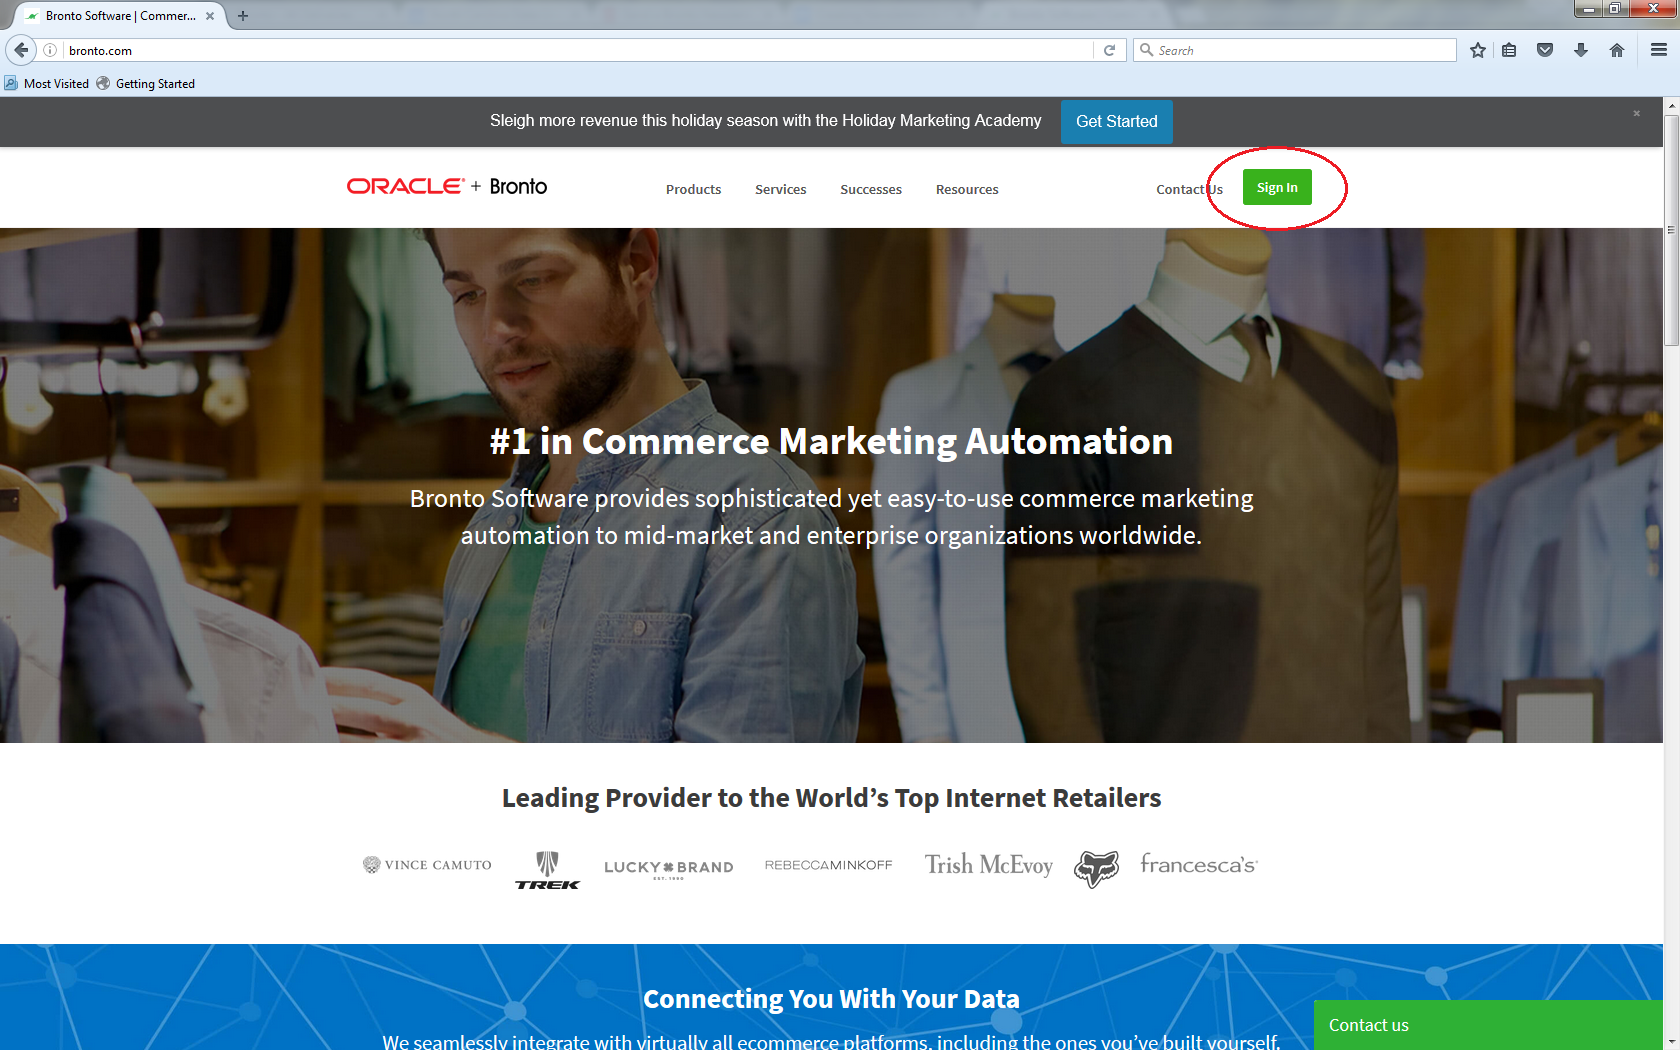
To access Bronto, go to www.bronto.com.
STEP 2:
Select “Sign In” in the top-right corner of the page.
STEP 3:
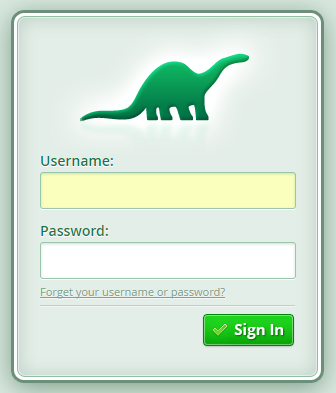
Enter the login credentials provided by the college communication office and CHASS Web Development.
STEP 4:
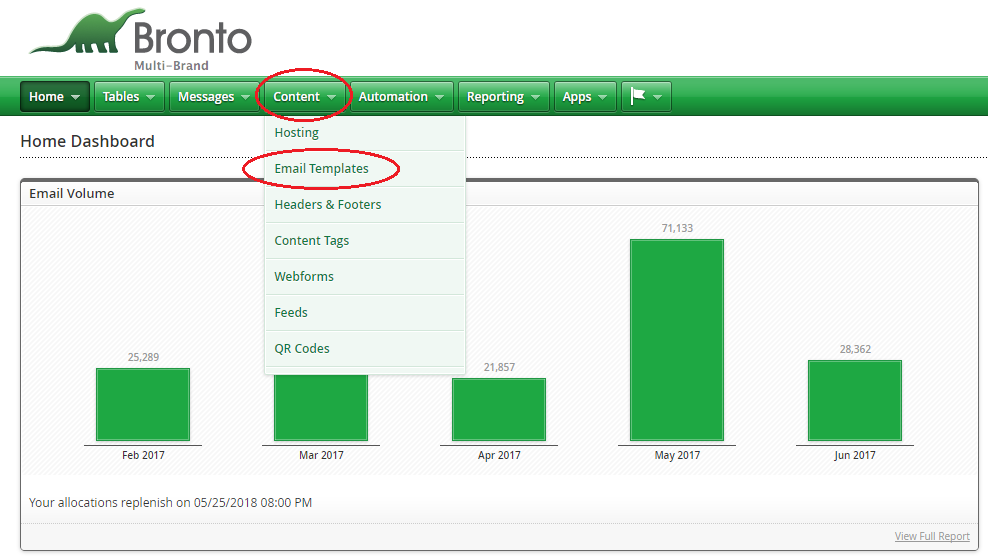
To create a message with the newsletter template, select the “Content” tab, then click “Email Templates.”
STEP 5:
Depending on whether you want to include photos in your newsletter, select either the “CHASS Newsletter (Stories with images)” or “CHASS Newsletter (Stories without images)” template. Click “Preview” to view the basic layout of each template. Click “Compose” to begin creating a message.
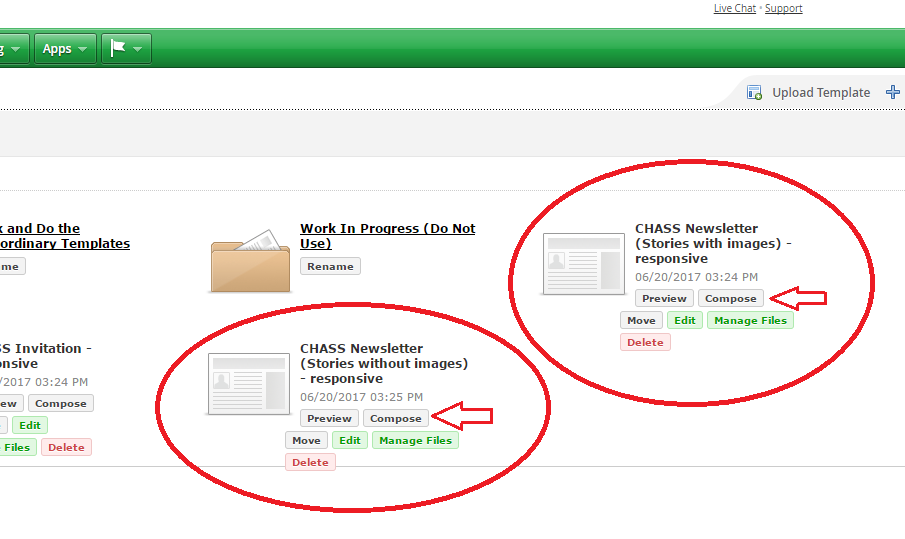
NOTE: You’ll use the same message to create each version of your newsletter. If you’ve previously created a message for your newsletter in Bronto (e.g. “Sociology and Anthropology Newsletter”, don’t create a new one. Rather, on the main navigation, click on “Messages,” then click “Messages” again, to locate and select your existing message. Click “Edit” to edit the content. It’s important to remember that in Bronto, each message can have multiple, unique deliveries. So while you’ll use the same message (e.g. “Sociology and Anthropology Newsletter”) to maintain a consistent format, you’ll be able to customize the content for each delivery (Fall, Spring, etc.).
STEP 6:
The following steps will detail how to populate the newsletter template with images, “CHASS Newsletter (Stories with images)”. Follow the same steps to populate the newsletter template without images, “CHASS Newsletter (Stories without images),” only disregard the instructions for photographs.
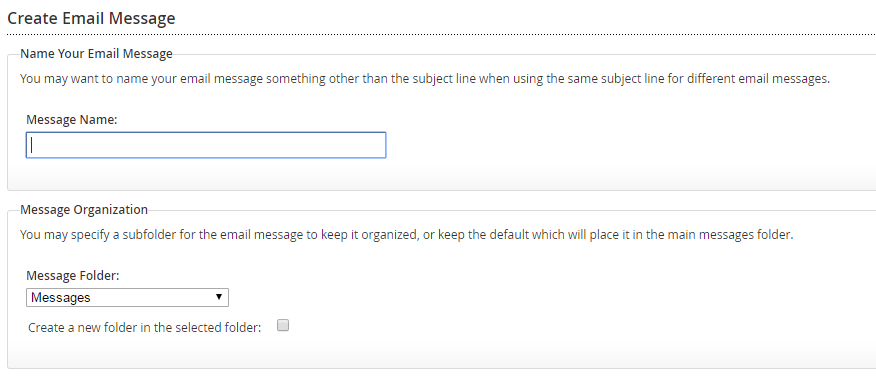
A) Name your message (e.g. “Sociology and Anthropology Newsletter”). This is not the subject line, but the name of the message that you’ll edit in Bronto. Under “Message Organization,” it’s recommended you save your email in the “Messages” folder; this should be the default setting, so you shouldn’t have to change anything.
B) Make sure the message type is “Template Message,” then click “Next.”

C) At the edit-message screen, you can customize the various components of the email, which include:
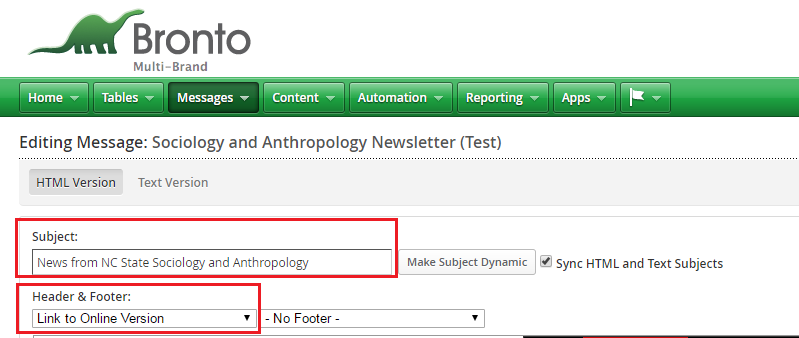
- Subject: This is the subject of the message that recipients will see in their inbox. Make sure that it’s clear, concise (less than 60 characters) and will appeal to your audience. To edit the subject, simply click in the box and type.
- Header/Footer: For the header, select “Link to Online Version.” Don’t worry about adding a footer; one is built into the email template.
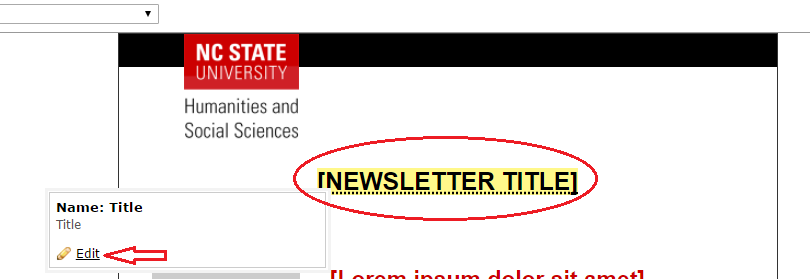
- Title: The title of the email. We recommend keeping this concise and consistent for each delivery (e.g. “Sociology and Anthropology News”). To edit the title, and to edit other fields in the message editor, hover over the title and click, “Edit.” A box will pop up, where you can enter the content of the title. Afterward, click “Save and Close” to return to the edit message screen.
- Content Blocks: The main content is comprised of a series of headlines, summary content, links and thumbnail images. This is where you feature events, stories or announcements that serve as the main newsletter content.
- Story Headline: Click on the headline and enter the text you want. You’ll have an option to link to whatever story, event or announcement you’re featuring, if applicable. Edit the content and click, “Save and Close” to return to the edit message screen.
- Teaser Text: Click on the teaser text and add a short summary of your story. Keep this content to one sentence or two short sentences. Click “Save and Close to return to the edit message screen.
- “Read More/Now” Link: Click the link and edit the link text and URL. To ensure the link remains red, enter the following in the “Style” field: “color: rgb(204,0,0); text-decoration:none”. Click “Save and Close to return to the edit message screen.
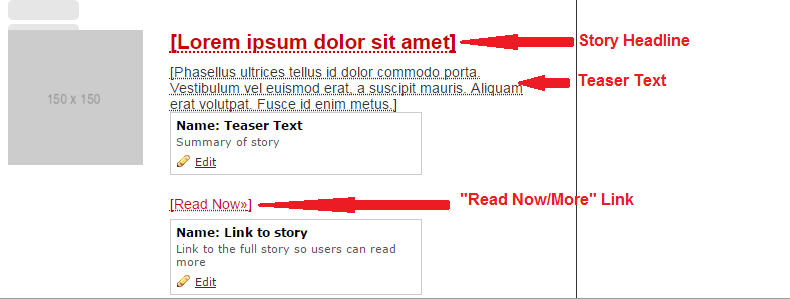
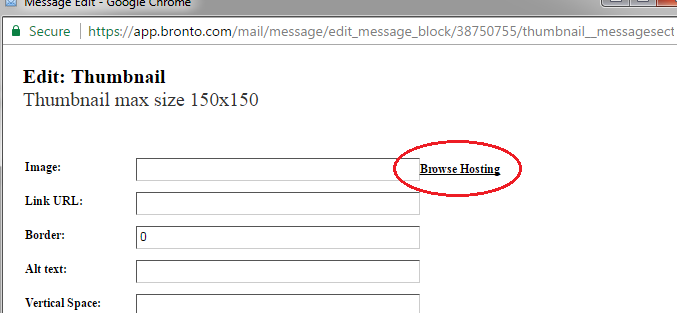
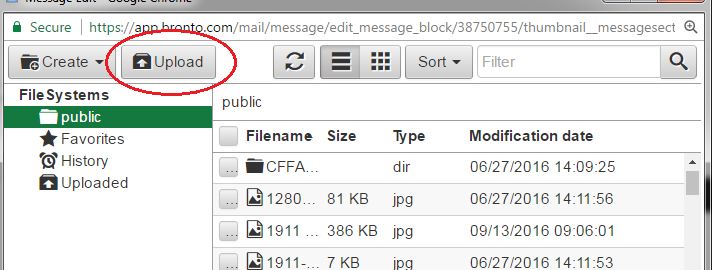
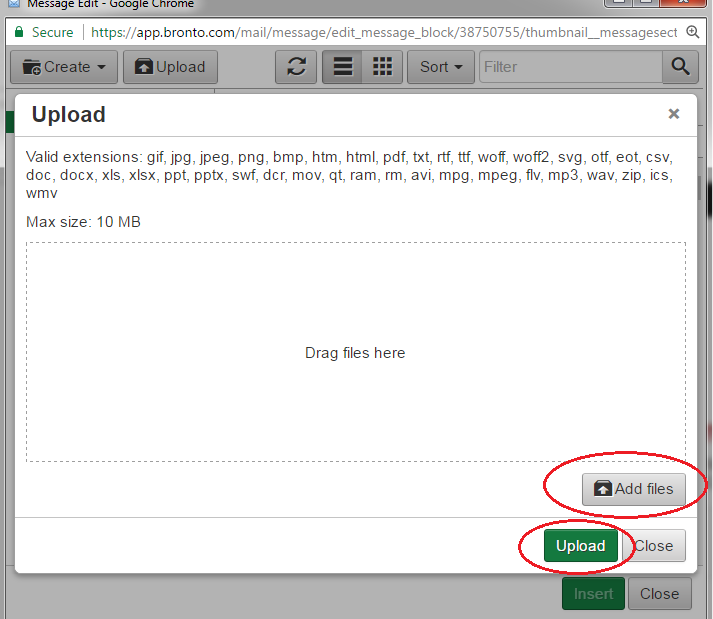
- Thumbnail (Image): Click on the gray thumbnail to add an image. In the pop-up box, you’ll see a “Browse Hosting” link to the right of the “Image” field. Click “Browse Hosting,” then “Upload” in the top left-hand corner. When the upload screen opens, click “Add File,” select the file you want, then click the green “Upload Button.” Now that your file is uploaded to Bronto, search for the title, select it and click “Insert.” Note: To maintain consistency in the template, crop your images to a square shape (e.g. 500x500 pixels), before uploading to Bronto.
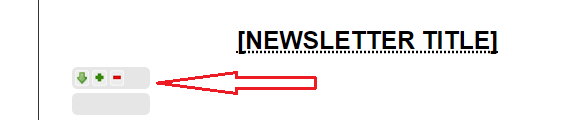
- Adding/Deleting Content Blocks: You can add additional content blocks by clicking the green “+” next to the first block. If you have multiple blocks on the page, you can sort them by clicking the “up” and “down” arrows and delete them by clicking the red “-”.
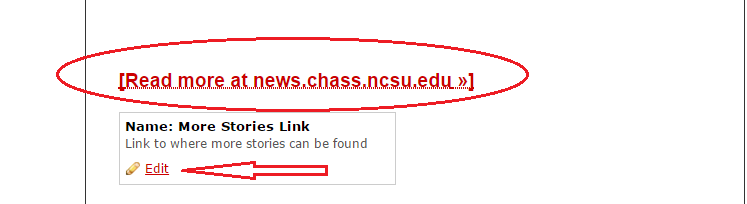
- More Stories Link: You can add a link to more content at the bottom of the newsletter. This is a good place to link to your website, news page or another related site.
STEP 7:
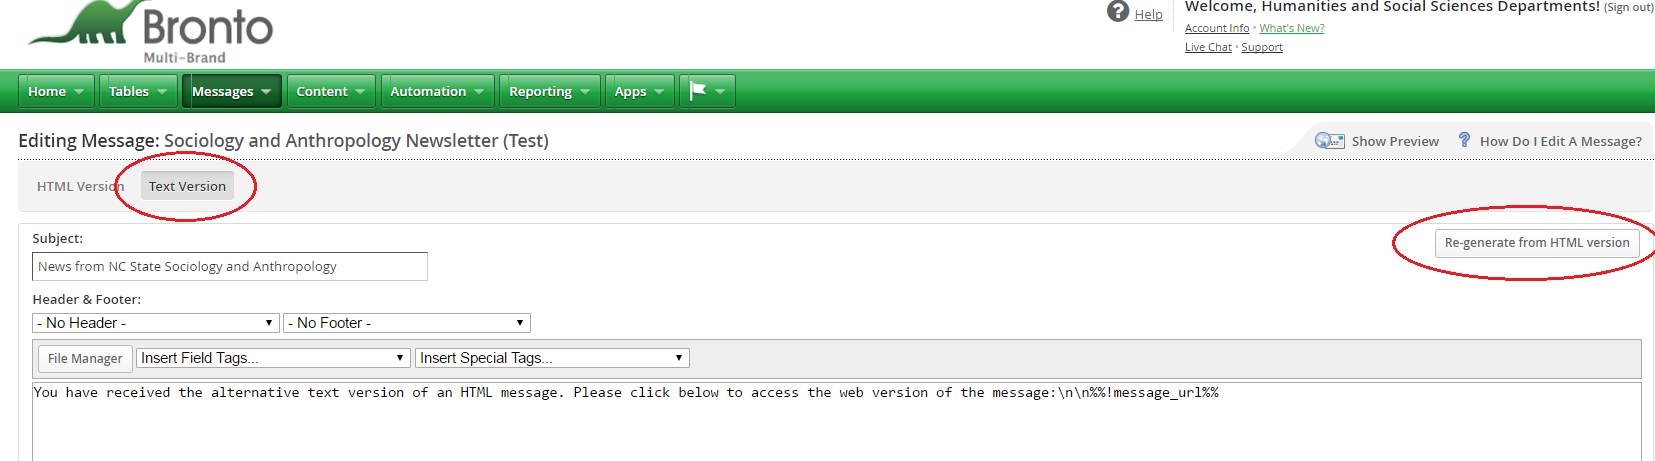
After you’re satisfied with your message content, switch over to the “Text Version” of your message and click “Regenerate from HTML version”.
STEP 8:
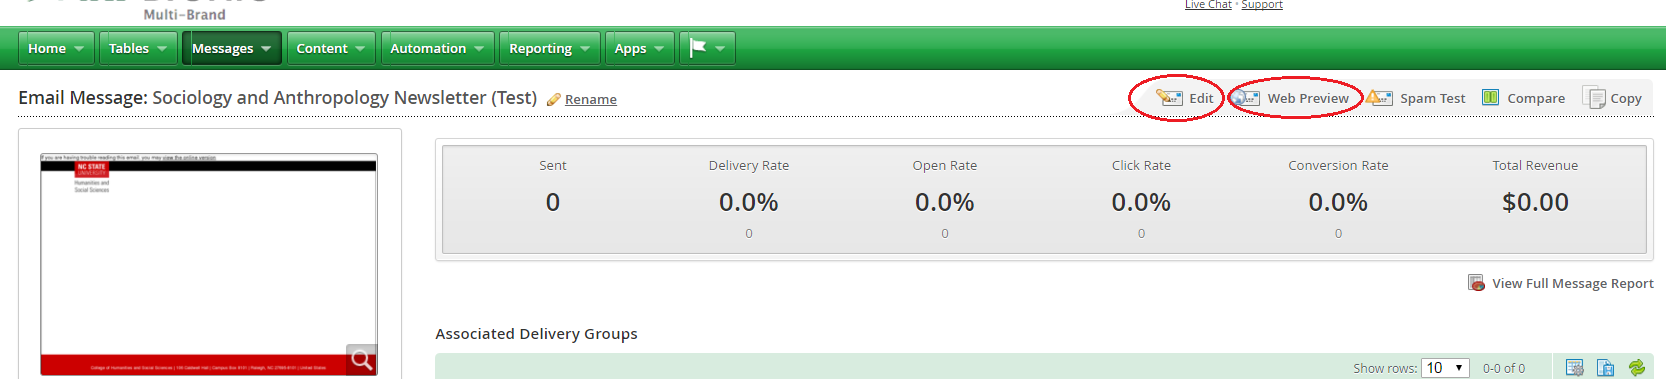
Clicking “Save and Close,” you’ll return to the message overview screen. Use the icons in the upper-right portion of the screen to look at a web preview of your message or go back and edit further.
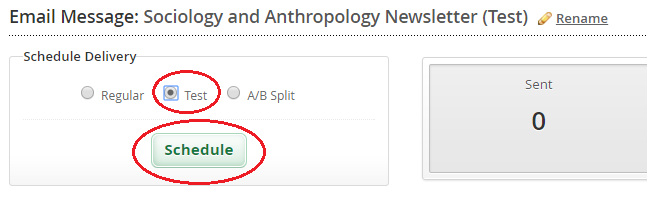
STEP 9:
We always recommend sending a test message first. From the message overview page, select the “Test” option under “Schedule Delivery” in the top-left portion of the screen. Then, click “Schedule.”
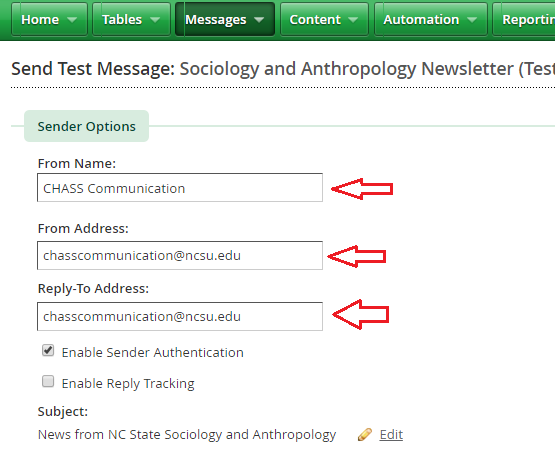
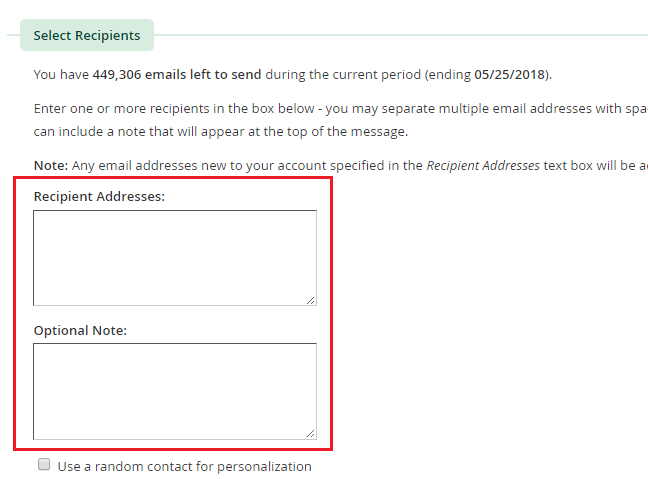
From the “Send Test Message” page, enter the “From Name,” “From Address,” and “Reply-To Address” for your test message (it’s OK to use your own name and email for the test message). One section down, under “Select Recipients,” enter the email addresses you want to send your test message to. Separate email addresses with a comma. Add an optional note if you’d like. Don’t worry about any of the other fields for your test message; scroll to the bottom and click, “Next.”
NOTE: If you don’t see the “Schedule Delivery” box in the top-right hand corner, your message has not yet been approved to send. Contact the college communication office to request your message be approved.
STEP 10:
Review your selections and your message layout. Click “Send Delivery” to send your test message.

STEP 11:
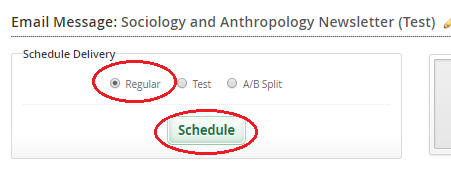
After sending your test and finalizing your message, you can begin sending your actual delivery by selecting “Regular” and “Schedule” under “Schedule Delivery” on the message overview screen.
NOTE: If you don’t see the “Schedule Delivery” box in the top-right hand corner, your message has not yet been approved to send. Contact the college communication office to request your message be approved.
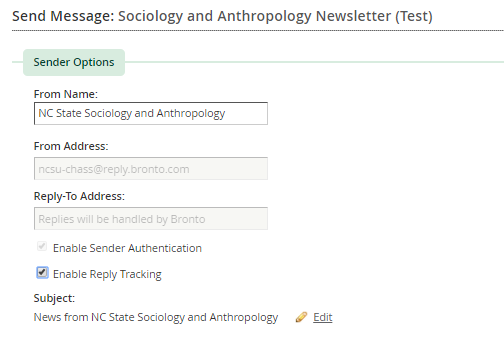
STEP 12:
Enter the “From Name” you want recipients to see in their inbox. If you would like Bronto to handle replies to your message (including out-of-office responses), select “Enable Reply Tracking”. You can check responses to your message in Bronto (on the sub-navigation, go to “Messages>Email Replies”).
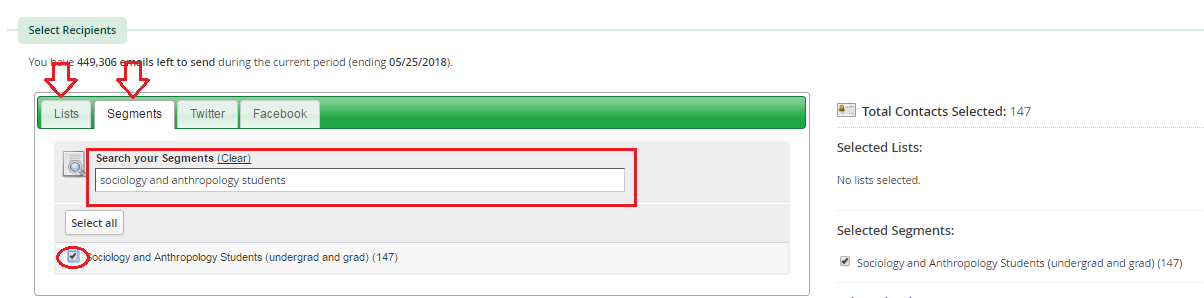
STEP 13:
In the “Select Recipients” section, you will choose which lists or segments you want to send to. Contact the college communication office, which manages lists and segments, to make sure your list or segment is updated and shows up as an option. Alumni lists need to be requested through the college communication office; you can use this request form.
To choose a list or segment, use the search option and click on the box next to the appropriate selection.
NOTE: If someone appears in more than one list, they will only receive the one submission.
STEP 14:
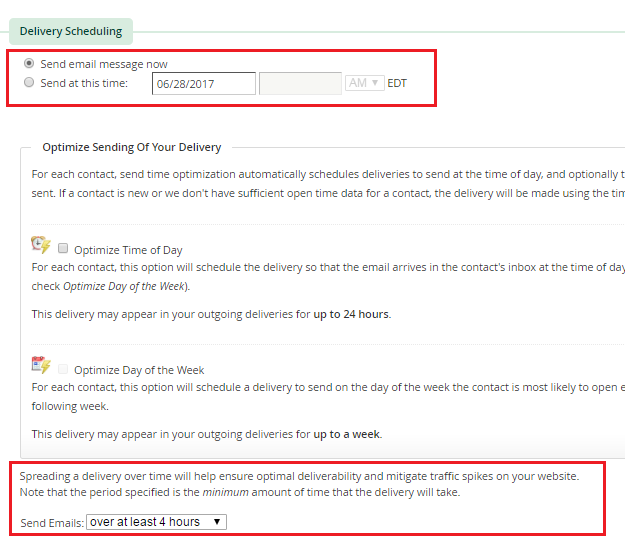
After selecting your lists or segments, you have several options for when to deliver your message. You can choose whether to “send now” (recommended) or schedule your message for another time. You can also decide whether to optimize your delivery by time of day or week; however, if you’re interested in one of those options, please contact the college communication office before proceeding.
If you’re sending to more than 2,000 contacts, please spread your emails out over at least two hours. If sending to less than 2,000 contacts, you can send your messages “as quickly as possible.” Select “Next” to go to the final “Send Message” screen.
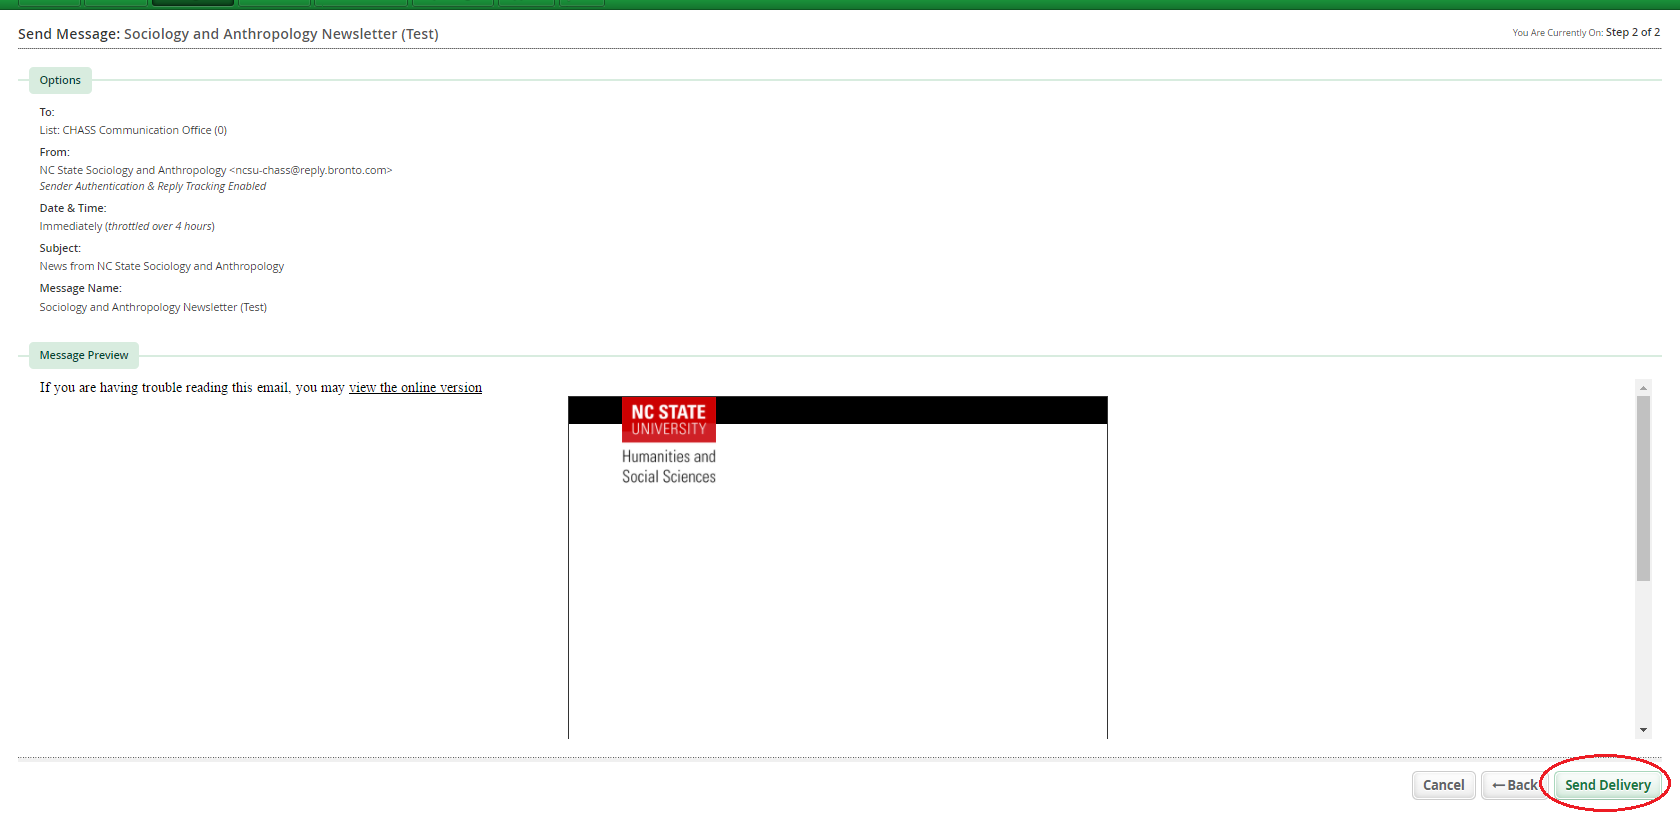
STEP 15:
Review your selections and view the preview of your message. If everything looks OK, hit “Send Delivery.”
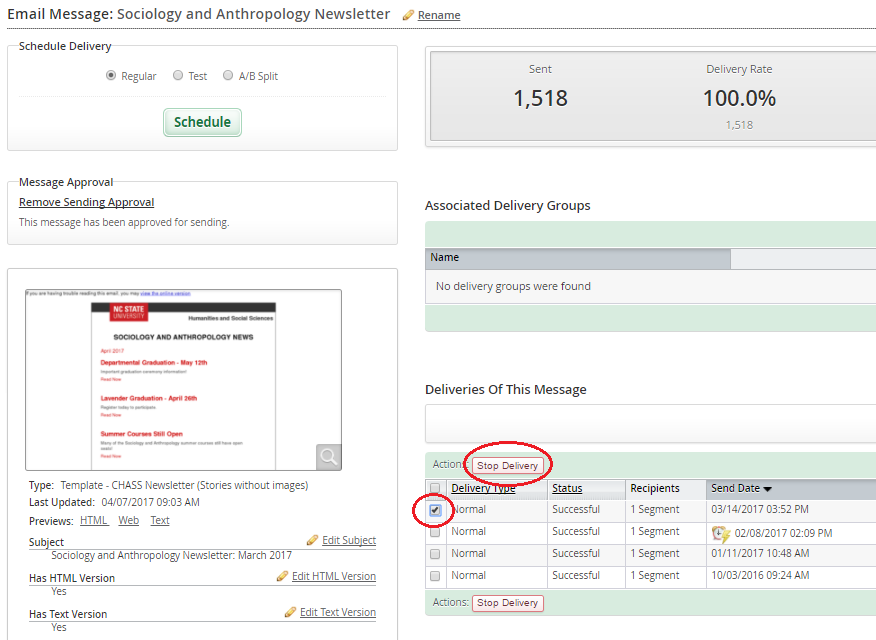
NOTE: After clicking “Send Delivery,” Bronto will begin the sending process — it typically takes about 2-3 minutes for messages to go out. If you notice a major error in your message while it is still being delivered, you can stop a delivery by selecting it under “Deliveries Of This Message” and clicking “Stop Delivery.” If you have to stop a delivery, contact the college communication office to help determine how many contacts received the stopped message and whether a corrected email is needed.
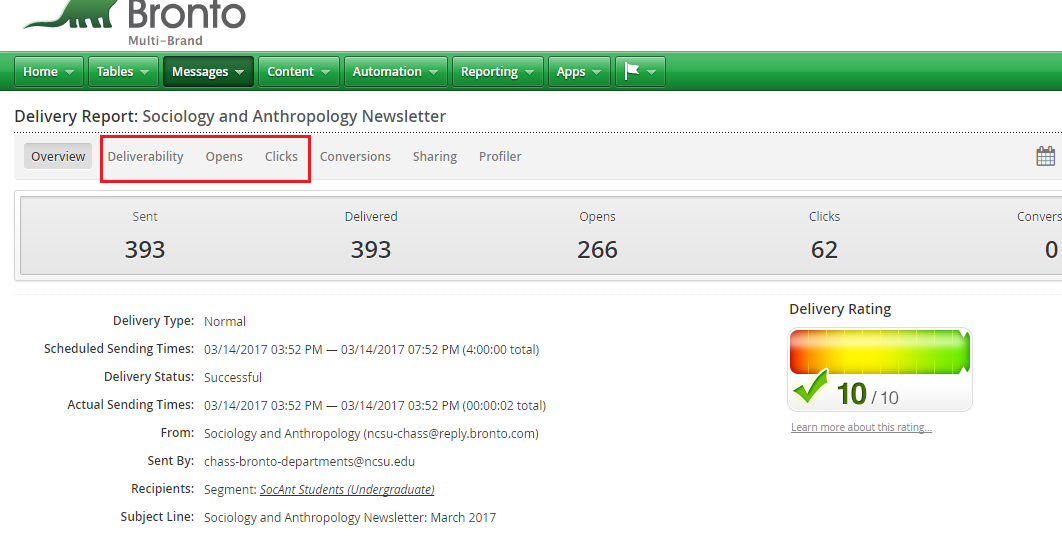
STEP 16:
After your message is sent, you can review its metrics by clicking on the delivery report icon (spreadsheet and pie-chart icon).
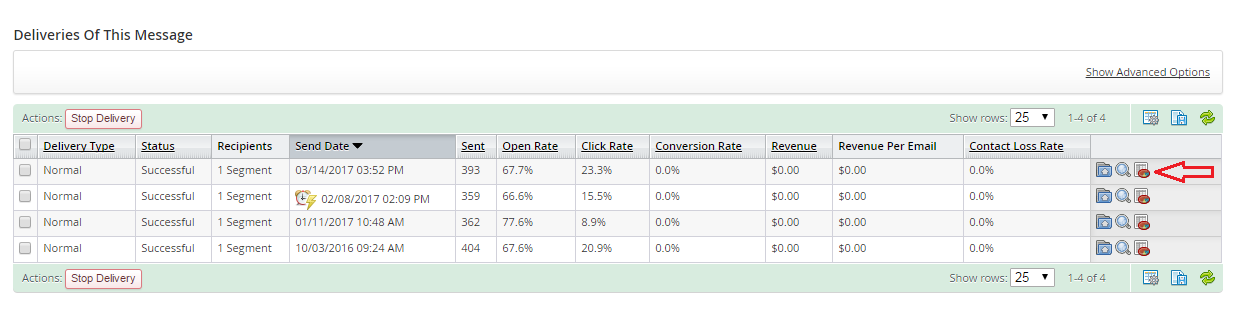
Once on the delivery report screen, you can view metrics for deliverability, opens, clicks, etc. Contact the college communication office if you have questions.