Microsoft PowerPoint 2013 Tutorial
Editing/Managing Media | Tutorial Main Menu | Training Homepage | Handouts
Section 5: Using Animation
With Microsoft PowerPoint 2013's animation feature, you can further customize how your media behaves in your presentation. In addition, it also gives you the ability to emphasize certain portions of your presentation. In this section, we will cover how to use animation to time your presentation's media, as well as how to add animation to particular objects.
Triggers
Triggers are a feature in PowerPoint that allows you to click on an object to reveal another form of media, such as an audio file, or to make objects appear, disappear, or move after a certain amount of time has elapsed.
As our example, we will use the audio file which we inserted into the presentation in the previous section on Managing Media.

Figure 5-1
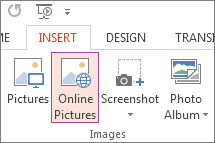
First, we must select a trigger object. This can be a text box, picture, or some other graphic or object already on the slide, or you can insert one. Since we already have the audio file inserted, we will insert a picture from the Web. To do this, under the INSERT tab, select Online Pictures from the Images icon group in the ribbon menu. After having performed a search for the image we want, we will insert it into the slide.

Figure 5-2
Next, select the audio file by clicking on it. Then, under the ANIMATIONS tab, click on the Trigger icon. In the drop-down menu, select On Click of, and then Content Placeholder 3 (this is the name that PowerPoint has given to the picture we have just inserted).

Figure 5-3
Now when you run the presentation and come to the slide the audio has been added to, simply click on the triggered image, and your audio will begin playing.
Adding Animation to Objects
There are a couple ways to add animation to an object on a slide. The first is the traditional method, which allows for more direct customization of the animations themselves, as well as their timing and order. The second is the quick method, which is best if you don't need to fine tune the animations on a particular slide.
Traditional Method

Figure 5-4
To add animation, click on the object you would like to animate (in this case, a text box). After having selected it, under the ANIMATIONS tab on the ribbon menu, select Add Animation, and in the drop-down menu, click on the animation you wish to add.

Figure 5-5
Once you select an animation, the Animation Pane will appear in your window on the right. Since we have selected a text box as our object of choice to animate, each of the points can be animated in a particular way. By clicking on the arrow to the right of our first point, a drop-down menu appears, providing further customization as to how the animation is ordered, as well as its timing. By default, the animation begins with the click of the mouse. By selecting Start With Previous, you can make the first effect begin automatically, and other effects follow upon the first without having to click your mouse at all. Clicking on Timing allows you to set the duration of the animation.

Figure 5-6
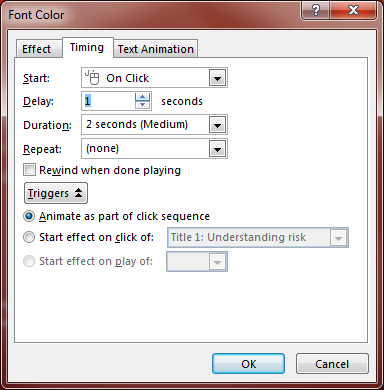
In the window that appears, you can customize how long it will be before the animation takes place, as well as how long it will last.
Quick Method
The above method of adding animations is good for a finely-tuned presentation, but sometimes it may be necessary to add an animation to an object quickly.

Figure 5-7
This can be done easily by using the Animation group of icons in the ribbon menu, under the ANIMATIONS tab. Just select what you would like to animate, and then choose an animation to go with it. Keep in mind that by default, the animations will be triggered by mouse click, and will proceed in the order in which they were initially created. You can preview what it will look like by clicking on the Preview icon on the far-left of the ribbon menu. Note also that you can have several animations applied to the same object.
Kinds of Animation
Now that we have covered the basics of how to add animations, we will take a look at the different kinds of animation that you can use in your presentation. This will not be an exhaustive list, but will cover only the basic categories of animations.
Entrance Animations. Entrance animations make the object appear on the slide from nothing, as well as govern how the object initially appears on the slide.
Animations for Emphasis. These animations do not cause the object to appear, but rather highlight the object in some fashion, while it remains continuously on the slide. These animations tend to be the least visually jarring within the context of a professional presentation.
Exit Animations. Exit animations cause the object to disappear, as well as govern the way in which they leave the slide.
Motion Paths. Motion paths cause the object to move around on the slide.
Slide Transitions
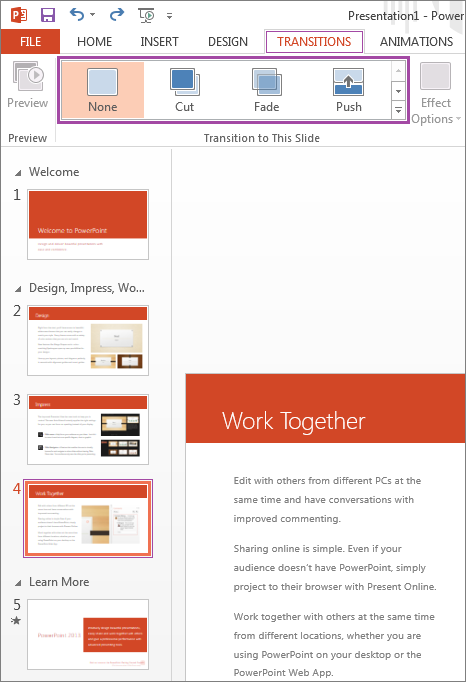
In addition to adding animations to individual objects on a particular slide, PowerPoint 2013 also gives you the ability to animate how the slides appear during your presentation, by offering a variety of slide transitions.

Figure 5-8
To add a slide transition, click on the slide you want to add the transition to, and click on the TRANSITIONS tab on the ribbon menu. Then, select the transition you would like for that particular slide.