Microsoft Word 2013 Tutorial
Page/Section Breaks | Tutorial Main Menu | Training Homepage | Tables
Section 4: Illustrations and Drawing
In addition to inserting and formatting text into your document, Word 2013 also allows you to insert text boxes, lines, shapes, images, ClipArt, and WordArt, through its image and drawing features. In this section, we will cover the diversity of these illustration functions in Word, as well as how to use them most effectively.
Whereas in the earlier versions of Microsoft Word, a drawing toolbar could be accessed at the bottom of the screen, in the more recent versions (including 2013), the only way to have access to this toolbar in the ribbon menu is by actually inserting a shape.
Finding the Illustrations Icon Group
The first step to inserting pictures or drawings in Word is accessing the Illustrations icon group in the ribbon menu.

Figure 4-1
As shown in Fig 4-1 above, the Illustrations icon group can be accessed by clicking on the INSERT tab just above the icons on the ribbon menu.
Adding Pictures

Figure 4-2
Step 1. To insert a picture saved on your hard disk, first select the Pictures icon from the ribbon menu.
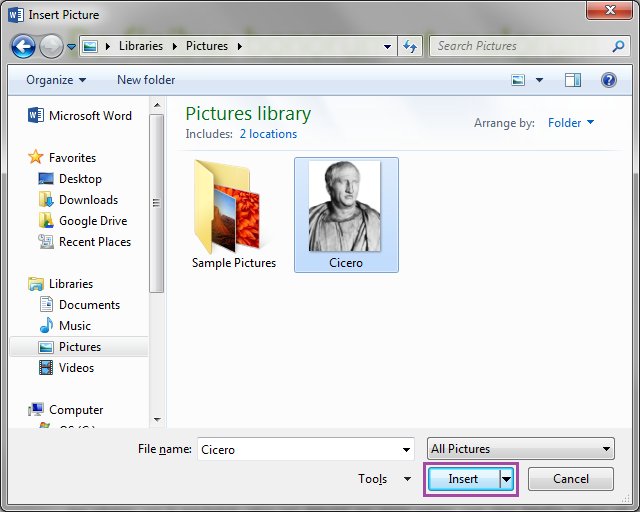
Figure 4-3
Step 2. A new window will appear, prompting you to indicate where on the hard disk the picture you want to insert is located. Once you have located the picture, click on the Insert button.
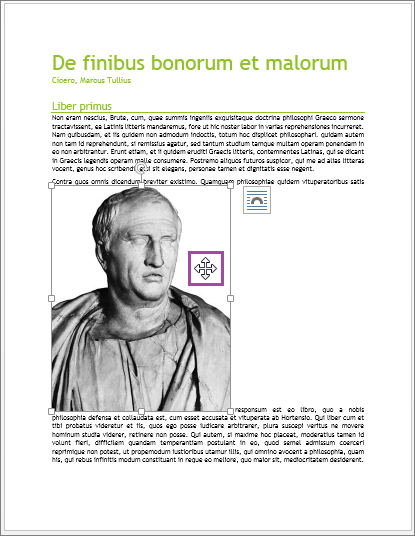
Figure 4-4
Step 3. Once the picture has been inserted, move the cursor anywhere over it, clicking and dragging to move it to where you want it on the page.
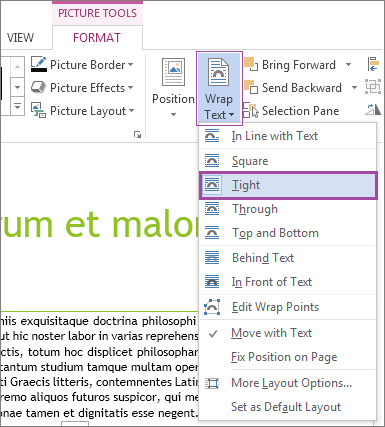
Figure 4-5
Step 4. When the picture is selected, the ribbon menu at the top will change to reveal the Picture Tools set of options. Using this menu, you can change the way the text wraps around the picture you have just inserted, by clicking on Wrap Text icon to reveal the drop-down menu. For the purpose of this tutorial, we will choose the Tight text wrapping option.

Figure 4-6
Step 5. Now that you have selected how you want the text to wrap around the picture, moving the cursor to its edge, you can click and drag to move or re-size it.
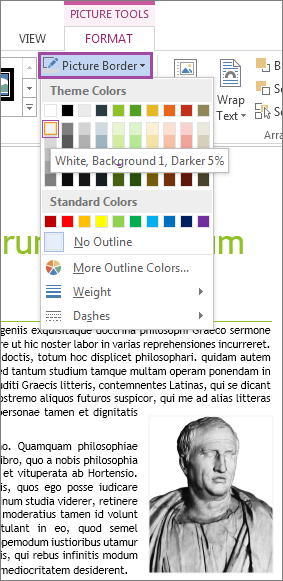
Figure 4-7
Step 6. Once the picture has reached the desired size and location on the page, you can format it further using the ribbon menu. For instance, you can change the color of the picture's border.
Tip. If the Picture Tools do not show up on the ribbon menu, double-click on the picture.
Inserting ClipArt
If your network or internet connection is active, you can insert ClipArt from Microsoft's online database.

Figure 4-8
Step 1. To insert ClipArt, click on the INSERT tab, and select Online Pictures.
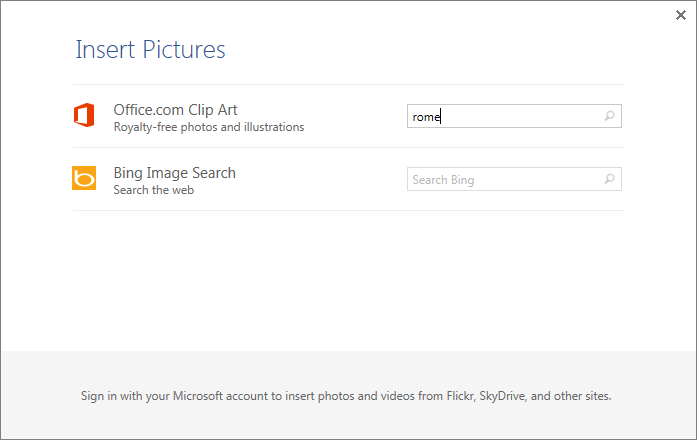
Figure 4-9
Step 2. In the dialog box, type in a subject in the Office.com Clip Art search field, and press Enter.
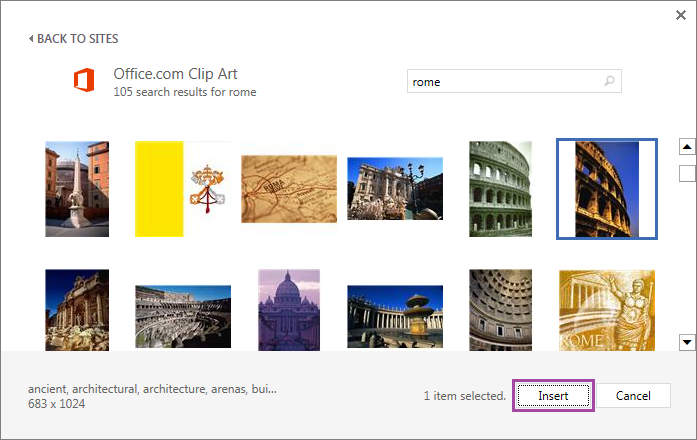
Figure 4-10
Step 3. Select the ClipArt image you want from the list of results that appear, and click Insert to add it to your document. You can move, re-size, format, or change text wrapping using the same method as pictures added from your hard drive (see Steps 3-6 above under Adding Pictures).
Inserting Shapes
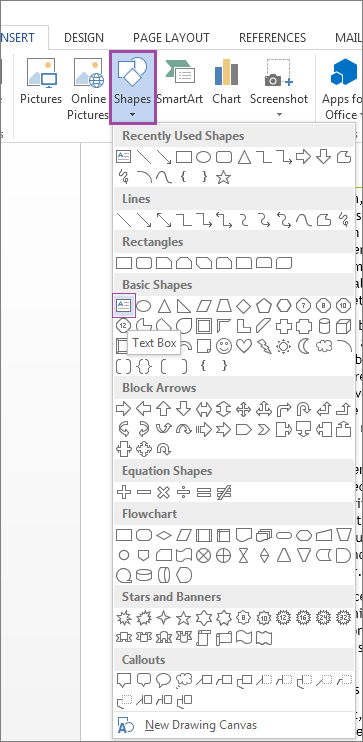
Figure 4-11
Step 1. To insert a shape, click on the INSERT tab. Clicking on Shapes, select the desired shape from the drop-down menu. Because this option is used quite frequently, we will select Text Box under Basic Shapes, for the purpose of this tutorial.

Figure 4-12
Step 2. Then, direct the crossbar to the desired place on the page, where you would like the shape to be inserted. Then, press and hold the left mouse button, dragging the cursor to change the size of the shape. When it reaches the desired size, release the mouse button.
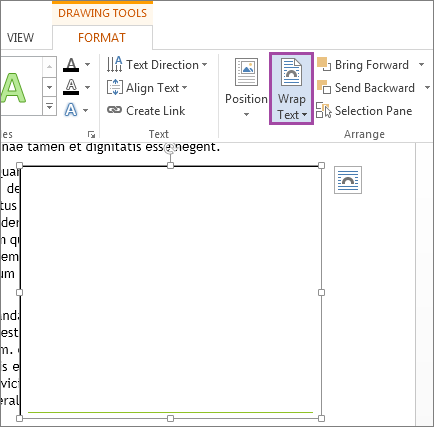
Figure 4-13
Step 3. Once the shape has been created, the Drawing Tools now appear in the ribbon menu, allowing you to change the shape in relation to the surrounding text. Click on the Wrap Text icon to reveal different wrapping options. In the case of a text box, you can click anywhere inside the box itself and begin typing to enter text.

Figure 4-14
Step 4. In the drop-down menu that appears, select how you want the text to wrap around the newly created shape. As above, in this tutorial we will select a Tight text wrapping option. Notice also, that the default settings for a newly created shape is to be in front of the text, and to move whenever the text itself is moved (i.e., to another part of the document).
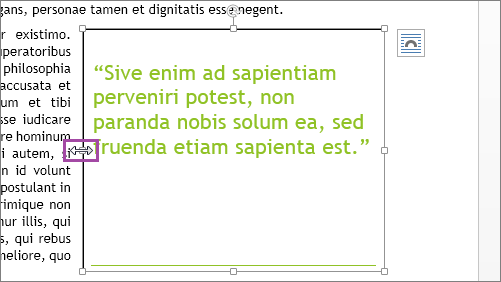
Figure 4-15
Step 5. Now that you have selected how you want the text to wrap around the shape, moving the cursor to the edge, you can click and drag to move or re-size it. If it is a text box, you can click inside of it and enter your text, formatting it as needed.
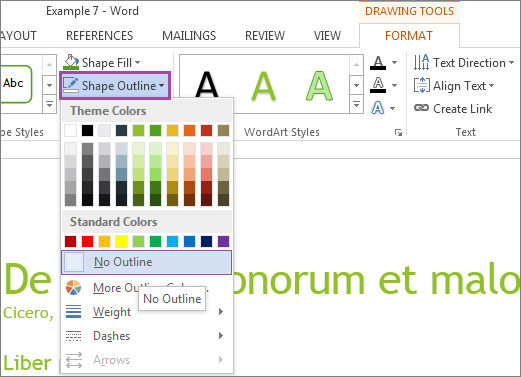
Fig. 4-16
Step 6. Once the shape has reached the desired size and location on the page, you can format it further. For instance, you can change the color of the shape's fill or outline, or choose to have both be transparent. For the purpose of this tutorial, we're going to select No Outline.

Figure 4-17
A shape has now been successfully inserted into the document. If you ever want to go back and change the layout options, click on the shape, and then click on the icon to the right of the shape. Further formatting options are accessible via the ribbon menu after double-clicking on the shape.
Commonly Used Shapes
Now that we have gone over the basics of inserting shapes, we will now look at the more commonly used shapes that are available in Word 2013.
Lines
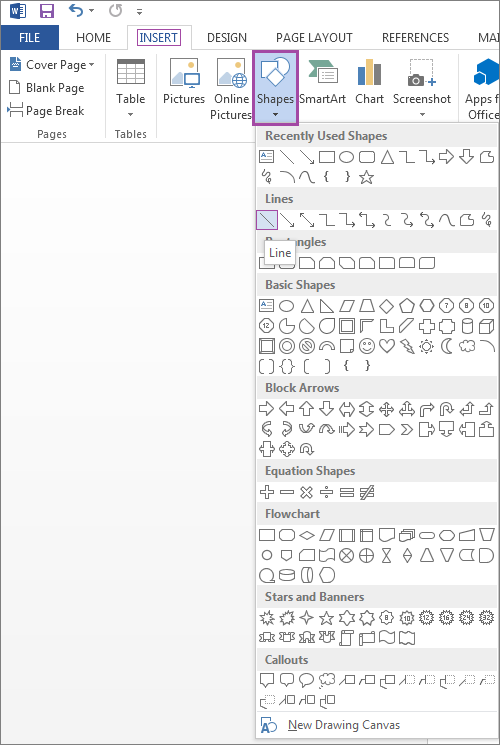
Figure 4-18
Step 1. To begin drawing a line, first click on the INSERT tab above the icons on the ribbon menu, and then Shapes, selecting the line you would like to insert. In this tutorial, we will select the most basic option, the line to the farthest left.
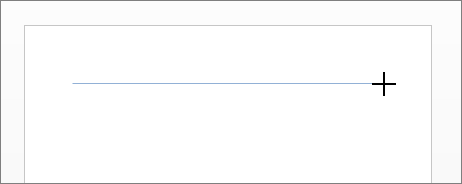
Figure 4-19
Step 2. Then, direct the crossbar to the desired place on the page, where you would like to insert your line. Click and hold the left mouse button, and drag across the page to draw the line. When it has reached the desired length, release the mouse button.
Tip. Holding down the Shift key while drawing a line will keep it uniformly flat, diagonal, or upright.
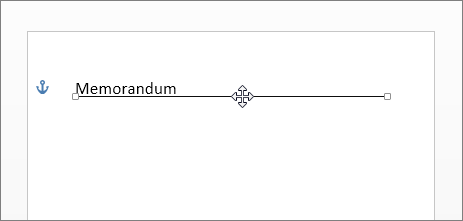
Figure 4-20
Step 3. If you want to move the line, place your cursor just above it, until you see the move symbol. Click and hold the left mouse button, dragging to relocate the line, and then release.
Arrows

Figure 4-21
There are two types of arrows available in Word 2013, namely line arrows and block arrows. Both can be found under the Shapes menu after clicking on the INSERT tab (see Fig. 4-18 above). Block arrows have their own grouping under the same menu. The only difference between drawing arrows and lines is to keep in mind that the arrow will point away from the starting point. Otherwise, the procedure for drawing arrows is the same as drawing lines (see Lines above).
Rectangles
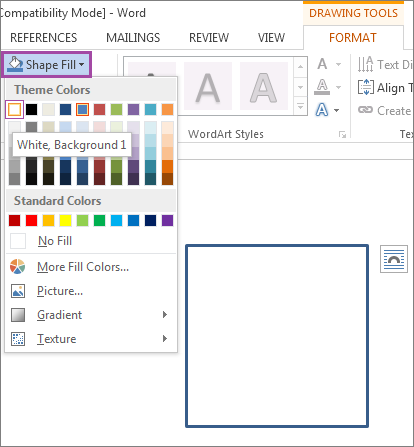
Figure 4-22
After selecting the rectangle option in the Shapes menu (see Fig. 4-18 above), click and drag from one corner to the other to create the rectangle. Drawing rectangles is similar to drawing any other shape, except that holding down the Shift key will cause it to be a perfect square. The fill of the rectangle can be changed by clicking on the Shape Fill option under the Drawing Tools. If they are not immediately visible, these tools can be accessed by double-clicking on the rectangle itself.
Ovals
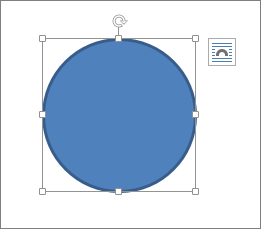
Figure 4-23
After selecting the oval option in the Shapes menu (see Fig. 4-18), drag the cursor from one corner to the other, holding down the left mouse button. As with rectangles, drawing ovals while holding the Shift key will perfect the shape, in this case making it a perfect circle.
Text Boxes
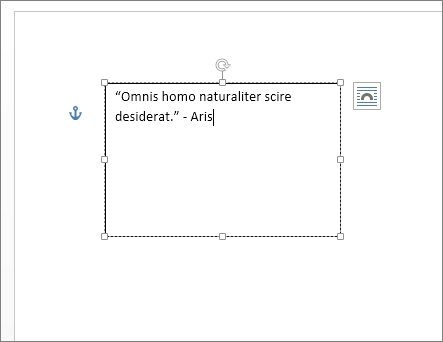
Figure 4-24
Text boxes are free-floating boxes that are able to display text without changing the formatting of the body text behind or around it. To insert a text box, simply click on the INSERT tab, and select Text Box to access the drop-down menu (see Fig. 4-24a below). For more information on inserting text boxes and other shapes, see Inserting Shapes). Once you have drawn the box, simply click inside it to add text. The text you enter can be formatted just like the body text.
SmartArt
In addition to the Text Box feature, Word 2013 also includes a feature called SmartArt, which allows you to represent ideas in diagram format.

Figure 4-25
Step 1. To insert SmartArt, click on the INSERT tab, and select SmartArt under the Illustrations icon group on the ribbon menu.
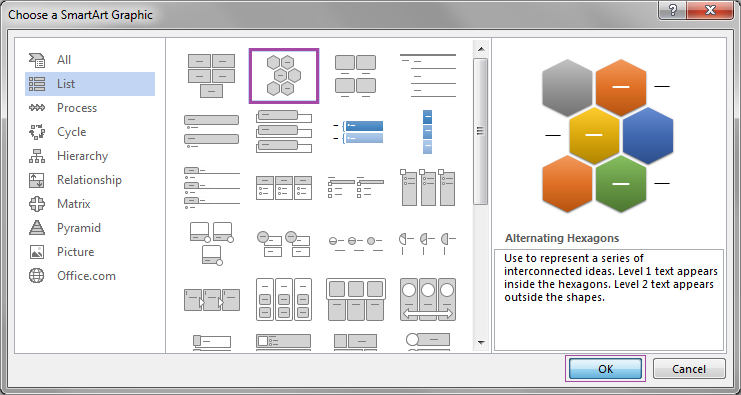
Figure 4-26
Step 2. A window will appear, prompting you to pick the kind of SmartArt graphic you would like to use. After selecting one from among the many options available, click OK.
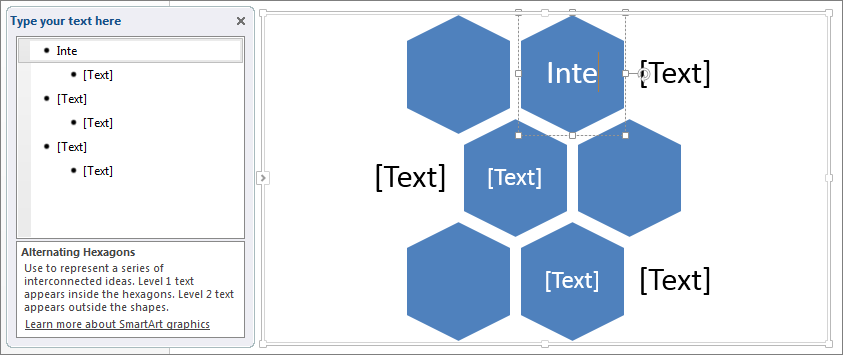
Figure 4-27
Step 3. Format the text of the SmartArt graphic either by clicking on the text, or using the outline to the left of the graphic.

Figure 4-28
Step 4. Using the ribbon menu while the SmartArt graphic is selected will allow you to further format it, changing various elements of its design. To move or re-size your graphic, or to change the way the text wraps around it, see Steps 3-5 under Adding Pictures.
Charts
Drawing charts has been a feature of Word since its inception, but in 2013 there are many more options available.

Figure 4-29
Step 1. To insert a chart, click on the INSERT tab, selecting Chart under the Illustrations icon group on the ribbon menu.
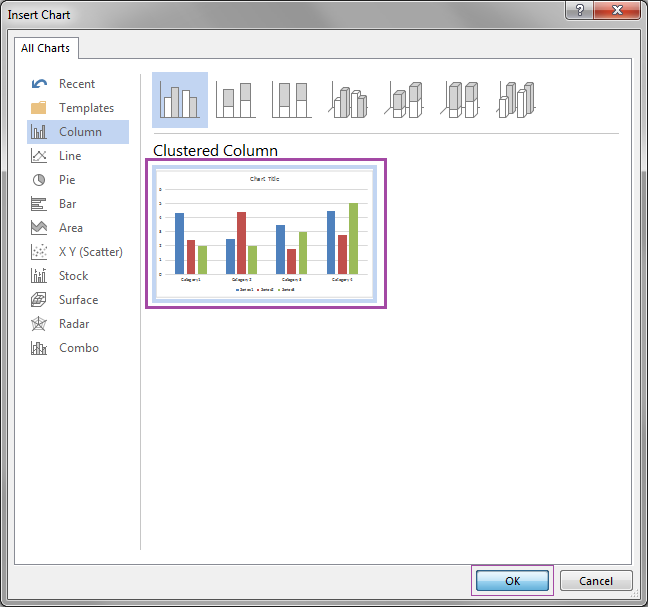
Figure 4-30
Step 2. Select what kind of chart you wish to insert, and then click OK.
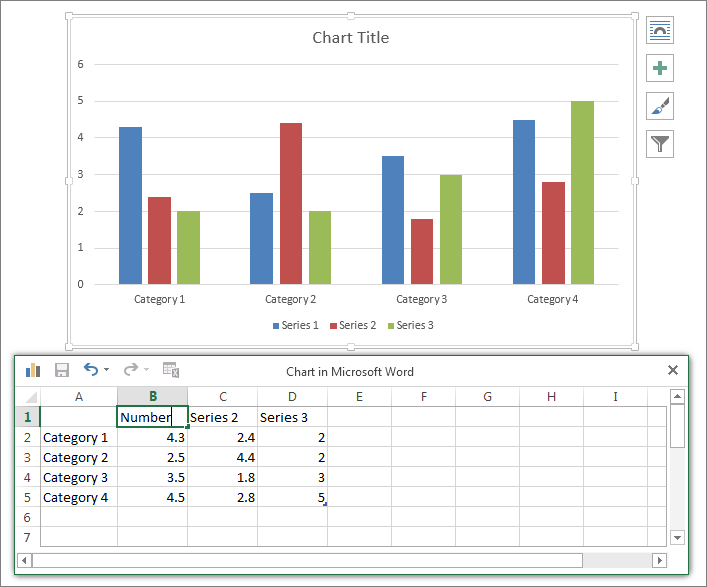
Figure 4-31
Step 3. Once the chart has been inserted, you can use the Excel popup window to edit the different fields. To format anything on the chart, simply click on what you would like to change. You may also use the ribbon menu. If you would like move or re-size your chart, or to change the way the surrounding text wraps around it, see Steps 3-5 under Adding Pictures.
Screenshots
A newer feature in Word is the ability to insert screenshots into your document, using the program rather than simply the print screen function of Windows.

Figure 4-32
To insert a screenshot into your document, click on the INSERT tab, selecting Screenshot under the Illustrations icon group on the ribbon menu. A drop-down menu will appear, showing you screenshots of all your open windows. To select one, click on it. Once it is inserted, you can further format it. If you would like move or re-size the screenshot, or to change the way the text wraps around it, see Steps 3-5 under Adding Pictures.
Inserting a Screen Clipping
If you don't want to insert a screenshot entire window into your document, you can take a screen clipping. The Screen Clipping option is found at the bottom of the Screenshot drop-down menu (see Fig. 4-32 above).

Figure 4-33
Once you have selected the Screen Clipping option at the bottom of the Screenshot drop-down menu (see Fig. 4-32 above), Word 2013 will minimize, and the screen will become grey. A crossbar will also appear, allowing you to click the left mouse button, and drag the cursor to encompass the area of the screen you would like to clip. Once you release the left mouse button, the screen clipping will appear in your document (see Fig. 4-34 below).

Figure 4-34
WordArt
WordArt is another popular feature of Word, which allows you to enter free-floating text without needing a text box. This feature is most useful for posters, flyers, announcements, etc.
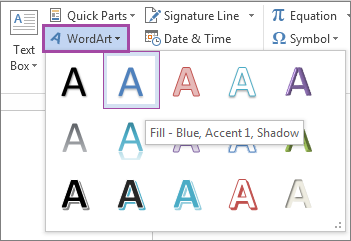
Figure 4-35
Step 1. To insert WordArt, click on the INSERT tab, and select WordArt to access the drop-down menu, which will present the varied WordArt styles for use in your document.

Figure 4-36
Step 2. Once the WordArt has been inserted, you may type in your text, and format it further. You can change the appearance of the WordArt you have inserted by accessing the WordArt Styles options in the ribbon menu, which are visible when the WordArt is selected.
Formatting
Although many of the options for formatting shapes and illustrations are close at hand in Word 2013, you may have need of more advanced formatting options.
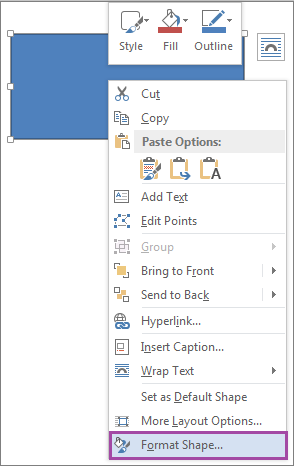
Figure 4-37
Step 1. To access the formatting menu, right-click on the shape or illustration, and select the option to format it at the very bottom of the menu that appears.
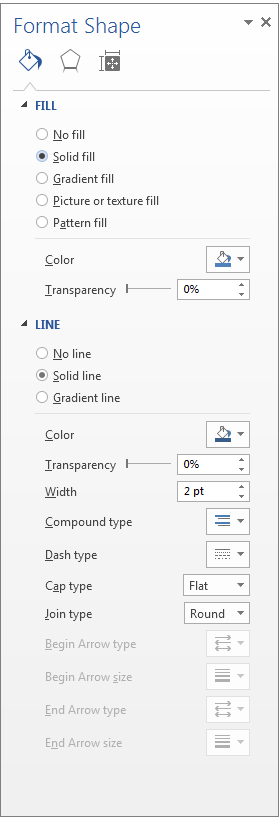
Figure 4-38
Step 2. A formatting menu will then appear on the right side of your screen, giving access to advanced formatting options.
Text Wrapping
There are a variety of different ways that you can wrap text around shapes or illustrations. What follows are some of the different methods of text wrapping available in Word 2013. The options for text wrapping are most easily accessed by the icon which appears next to the shape or illustration (see Fig. 4-39 below), or by selecting the FORMAT tab, and clicking on the Wrap Text icon. Both are made available by clicking on the shape or illustration.

Figure 4-39
For even more advanced formatting, click on the See more option at the bottom of the LAYOUT OPTIONS menu.
Methods of Text Wrapping
In Line with Text
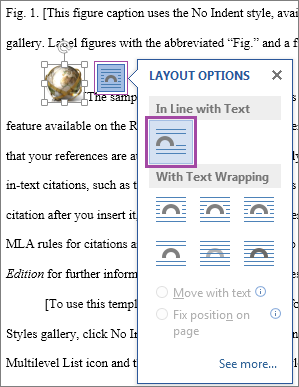
Figure 4-40
This is the normal kind of text wrapping for most small shapes and illustrations, and is often the default setting. If the object is small enough, it will not force the text to the next line. This method of text wrapping anchors, so to speak, the object to the surrounding text and moves with it as if part of the text itself.
Square with Text
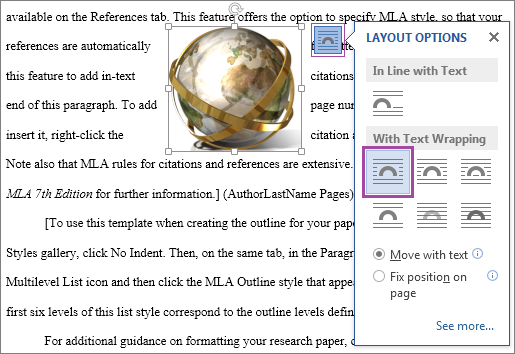
Figure 4-41
Square text wrapping wraps the text around the object in a rectangular fashion. Unlike the inline option, the object does not remain anchored to a particular line in the text, but rather causes the text to move around it.
Tight
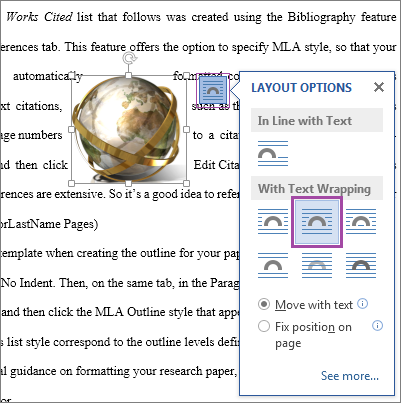
Figure 4-42
The tight text wrapping option keeps the text as close as possible to the object. For instance, if the object is circular, the text will surround it in a circular fashion.
Top and Bottom

Figure 4-43
This method of text wrapping places the text above and below rather than around the object. This method is particularly useful for charts, graphs, or illustrations which span the breadth of the page itself.
Behind Text
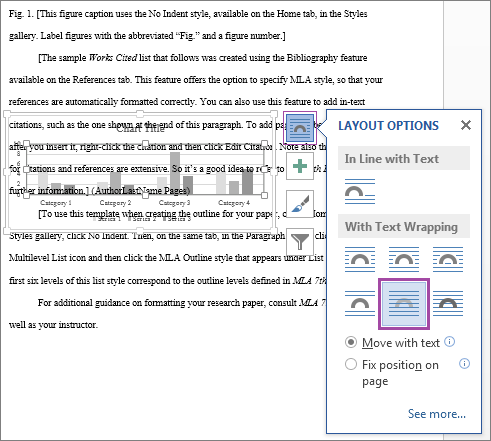
Figure 4-44
This method prevents the object and the text from being affected by one another, and causes the object to be placed behind the body text of the document.
In Front of Text

Figure 4-45
This option causes the object to behave in a similar fashion to the behind text option, only it is placed in front of the text rather than behind it.
