Microsoft Word 2013 Tutorial
Illustrations/Drawing | Tutorial Main Menu | Training Homepage | Margins
Section 5: Tables
In creating a document, it is sometimes necessary to present data in an organized fashion. One of the ways of doing this is to make use of the Table function in Word 2013.
Creating Tables

Figure 5-1
To insert a table, first click on the INSERT tab, and select Table to make the drop-down menu appear.
Note. From here, there are several different methods of creating a table (see Fig. 5-1 above):
Method 1. One method is to hover the cursor over the series of boxes at the top of the table menu, telling the program what dimensions you would like for the table you are creating. For instance, if your table is to be 5 x 5 cells, hover your cursor over the box that is five cells across and five down. Click the left mouse button, and the table will be created automatically, placed at the location of the cursor in the body of the document. This is the fastest way to create a table essentially from scratch.
Method 2. A second method is to select Insert Table in the drop-down menu. A window will appear (see Fig. 5-1a below), where you will be asked to indicate the dimensions of your table by manually entering in the number of columns and rows. You can also specify whether you want the table to have a fixed column width, be just large enough for the contents of the table, or span across the entire page. Check the box at the bottom of the window if you want the dimensions of new tables to be the same as the one you are currently making.

Figure 5-1a
Once you have indicated how you would like your table to be drawn, click OK. This is also a fairly quick way to draw a table, and is also the "classic" method of doing so in Word.
Method 3. A third method is to allow Word 2013 to create a table for you from a list of pre-formatted templates using the Quick Tables feature (see Quick Tables below).

Figure 5-1b
To use this method, hover your mouse cursor over the Quick Tables option in the drop-down menu, and select a table format from the options provided (see Fig. 5-1b above). We will not be covering this method in this section of the tutorial.
Once the table has been created, then its properties may be changed if need be. To do this, select the table by clicking on the  icon to the top left of the table, using the tabs under the Table Tools which appear in the ribbon menu (see Fig. 5-2 below).
Figure 5-2
Table Design
Clicking on the DESIGN tab under Table Tools will cause the ribbon menu to change, bringing up three groups of options: 1) Table Style Options, 2) Shading, and 3) Borders.
Table Styles
The first group of options, Table Style Options, controls what shows up in the second group, Table Styles (see Fig. 5-3 below).

Figure 5-3
By clicking on each of the different check boxes, you can view all the styles available which fit the criteria you specify.
Shading

Figure 5-3a
To quickly change the background shading of the cells, click and drag the cursor to select them (or, alternatively, click on the icon to select the whole table) and select Shading on the ribbon menu.
Borders

Figure 5-3b
To manually change the borders on your table, you can use the Borders options. After selecting a different border from the Border Styles menu, a paintbrush will appear as your cursor, and you can click, or click and drag to change the different table properties. You can also change the type of border used, the thickness, and whether you want borders around each cell, group of cells, or around the entire table.
Table Layout
When the table is selected, the options in the ribbon menu allow for more options for the layout of your table.


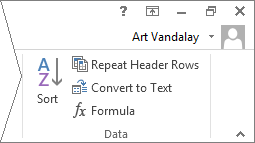
Figure 5-4
By clicking on the LAYOUT tab under Table Tools, you can insert or delete rows, columns, and cells, merge and split cells or tables, change how the table fits on the page, height, width, and the way the text is formatted.
What follows is a brief overview of what each of these functions do, beginning from the top left of Fig. 5-4 above, and ending at the bottom right.
Table Layout Functions
 Select. Opens a menu whereby you have the option of selecting a particular cell, column, row, or the entire table.
 View Gridlines. This option, when selected, allows you to view the gridlines of your table in Word, even when they will be invisible on the printed copy
 Properties. Opens a window where you are able to manually edit the physical properties of the table, columns, rows, or cells.
 Draw Table. This function allows you to manually insert cells into your document, by clicking and dragging your mouse.
 Eraser. Using this function, you can eliminate individual cell, column, and row boundaries by simply clicking on them.
 Delete. Allows for the deletion of cells, rows, columns or the entire table.
 Insert Above. Inserts a row of cells directly above the cursor.
 Insert Below. Inserts a row of cells directly below the cursor.
 Insert Left. Inserts a column of cells directly to the left of the cursor.
 Insert Right. Inserts a column of cells directly to the right of the cursor.
 Merge Cells. By clicking and dragging on particular cells to select them, click on this icon to merge them together.
 Split Cells. This function divides the current cell in two.
 Split Table. Splits one table into two.
 AutoFit. Clicking on this icon will cause a drop-down menu to appear, allowing you to specify whether you want the dimensions of the table to fit the contents, the window, or if you would like all the columns to be of fixed width.
 Height. The box to the right of the icon will allow you to change the height of the selected cells.
 Width. The box to the right of the icon will allow you to change the width of the selected cells.
 Distribute Rows. By selecting several rows of cells, clicking on this icon will cause the rows selected to be evenly distributed.
 Distribute Columns. By selecting several rows of cells, clicking on this icon will cause the selected columns to be distributed evenly.
 Cell Alignment. These options allow you to align the text of the selected cells. The default alignment is left horizontally, and top vertically.
 Text Direction. This feature changes the text direction of the selected cells from horizontal to vertical. To get the direction exactly the way you would like it, you may have to click several times.
 Cell Margins. This option will bring up a window, allowing you to manually enter specifications for the margins of a selected cell or group of cells.
 Sort. By clicking on this icon, the selected data will be sorted either alphabetically or numerically.
 Repeat Header Rows. This feature will allow you to designate several rows as headers in a table. This makes it easier view tables which span more than one page, and keeps you from having to continually scroll back up (or turn to the first page) to remember what fields go with which columns.
 Convert to Text. This feature allows you to convert your data from table to text format. This is especially helpful when you need to copy and paste data into a format that does not support tables.
 Formula. Add an Excel formula to a cell to make it perform a calculation.
Quick Tables
If you don't want to insert a table into your document manually, you can use the Quick Tables feature.

Figure 5-5
To insert a Quick Table, simply click on the Table icon under the Insert tab in the ribbon menu. Move your mouse over the Quick Tables sub-menu, and select the type of table you would like to insert.

Figure 5-6
To choose a different layout and design for the table, click on the DESIGN tab under TABLE TOOLS, and click on the icon highlighted above (Fig. 5-6).