BlueGriffon Tutorial
<< The Source View | Tools and Preferences >>
Testing and Uploading Your Site
Once your site has been successfully completed, you will need to test it within a web browser to make sure everything displays and functions correctly.
Previewing Your Site

Fig. 14-1
To preview your site, click on the icon in the main toolbar labeled Preview in browser, located on the far right, next to the BlueGriffon logo (Fig. 14-1).

Fig. 14-2
After a few seconds, the page will be loaded into your default browser. Note that this does not mean that the site itself has been published, but rather, it remains on your hard disk in a local folder (Fig. 14-2).
After you have previewed your site, you can now upload it to your ww4 webspace. If you have not already done so, you can learn how in the Setting Up Your Webspace section in the Appendix of this tutorial.
Publishing Your Site via FTP
Once you have previewed your site, and everything seems to be in order, you can then upload your site using the FireFTP extension.

Fig. 14-3
Before using FireFTP, you will want to make sure that Firefox is set as your default browser. To do this, open Firefox, and click on the Firefox tab. Select Options from the Options menu (Fig. 14-3).

Fig. 14-4
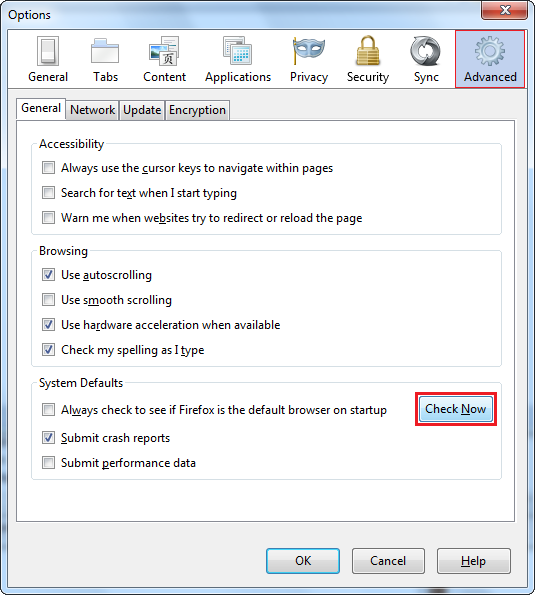
Select the Advanced tab, and click on Check Now (Fig. 14-4).

Fig. 14-5
If Firefox is not your default browser, a dialog window will appear, prompting you to make it the default browser. Click Yes (Fig. 14-5).

Fig. 14-6
Next, switch back to BlueGriffon, and select FireFTP from the Tools menu (Fig. 14-6).

Fig. 14-7
Navigate to the site directory in the left column, where your site and its files are kept on your local machine. In the right column, you may also navigate to the location of the web server. Once finished, select Create an account from the drop-down menu (Fig. 14-7).
.png)
Fig. 14-8
Under the Main tab, in the Main Details section of the Account Manager window, enter the Account Name (you can use any name for this, but for our purposes we will use "NCSU Webspace" and the Host (ftp.ncsu.edu). In the ID section, enter your Unity ID and password. When you've entered all the information, click on the Connection tab (Fig. 14-8).

Fig. 14-9
Under the Connection Type section, click on the drop-down menu under Security and select SFTP (Fig. 14-9).

Fig. 14-10
At this point, you may need to specify the location of a private key, whereby the program can confirm that the server it is connecting to is actually the correct one. If you need to do this, click Browse under Private Key and navigate to the location of the key on the server. Under the Initial Directories section, click on Use Current (unless you didn't navigate to the site directory on your hard disk at the outset, in which case you will need to enter the path manually).
Then, enter the location of the web server under Remote:
- Your webspace location is determined by the server, and is dependant upon your Unity ID. So, the path will be:
/afs/unity.ncsu.edu/users/[first letter of your Unity ID]/[Your Unity ID]/www
- In the case of A. Vandalay (avandala), it would be:
/afs/unity.ncsu.edu/users/a/avandala/www
If you already navigated to the appropriate directory on the web server from the beginning, you can simply click Use Current here as well). For ease of navigation, you may want to click on the check box next to Keep directories in sync while navigating. When finished, click OK (Fig. 14-10).

Fig. 14-11
If the program doesn't connect automatically, click Connect in the main menu (Fig. 14-11).

Fig. 14-12
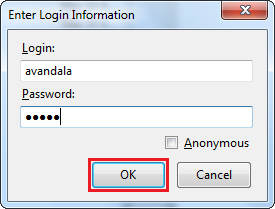
Once the program begins communicating with the web server, you may be prompted to enter your login information again (Fig. 14-12). If so, enter it and click OK.

Fig. 14-13
Once the connection has been made sucessfully, select all the files you want to publish to the web server, and click on the right arrow to copy them over (Fig. 14-13). Once that is done, your website will have been successfully uploaded.
After it has been uploaded, your site should then be accessible under www4.ncsu.edu/~[Your Unity ID].
Now that we have covered the basics of site creation and uploading, in the next couple of sections we will treat the more advanced settings of the BlueGriffon program itself, beginning with Tools and Preferences.