Microsoft Word 2013 Tutorial
Formats | Tutorial Main Menu | Training Homepage | Templates/Themes
Section 15: Protection and Security
When working on a document with sensitive data, it is sometimes necessary to add a layer of protection or security. The document can be marked as final, or special privileges can be assigned, whereby the document can only be altered or opened by a select group of people. In this section, we will cover how to use the security features in Microsoft Word 2013 to prevent unauthorized access to a particular document.
Accessing the Document Protection Settings

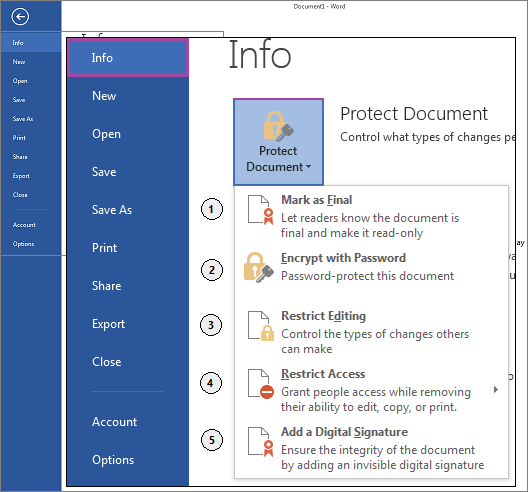
Figure 15-1
To access the security settings, click on the FILE tab on the ribbon menu. When the File screen appears, select Info, and click on the Protect Document icon to reveal the drop-down menu.
From here, you have five options available to you to add security to your document. We will cover what each of these options do, and their proper implementation.
Types of Document Protection
1. Mark as Final. While not a security setting per se, since it is possible for it to be removed by anyone opening the document, this option does keep whoever does open it from making changes to it accidentally. Choosing this protection option will make the file read-only, and mark its status as final; although, it should be noted that if the document is opened by a previous version of Microsoft Office, it will not be read-only.
2. Encrypt with Password. The easiest way to add a layer of security to your document is to encrypt it with a password, such that only those who enter the password are able to gain access to the document. Keep in mind however, that although you can change or remove the password once the document is open, if you lose or forget the password after the document has been closed there is no way to recover the information.
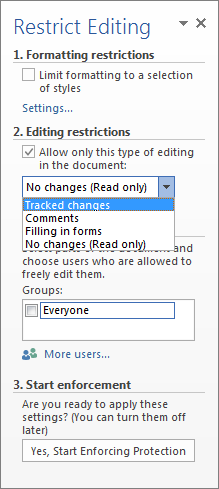
3. Restrict Editing. This security option is more customizable. Rather than simply password-protecting your entire document, you can specify exactly what kinds of changes are allowed to be made and by whom. This is particularly helpful for surveys, forms, and other such documents.

Figure 15-2
When this option is selected, the Restrict Editing sidebar will appear on the right, giving you a variety of options to restrict the types of changes made to the document, and who is allowed to make those changes. You can also customize which users or groups may freely edit those parts of the file you specify. When finished, simply click Yes, Start Enforcing Protection.
4. Restrict Access. This option restricts access to those who have permission to edit the document. This is accomplished through Windows Live, or using Windows user accounts.
5. Add a Digital Signature. Adding a digital signature to your document allows the recipient to sign his or her name on the document, verifying its contents.
[Back to Top]