Microsoft Word 2013 Tutorial
Margins | Tutorial Main Menu | Training Homepage | Indents/Tabs
Section 7: Paragraphs and Headings
There are many different spacing requirements for different kinds of documents. A paper or thesis is not going to have the same line spacing as a formal letter, for instance. Some documents also require headings, while others do not. In this section, we will cover the various paragraph and spacing options available in Microsoft Word 2013.
Line and Paragraph Spacing
Changing Line Spacing

Figure 7-1
Step 1. To change the line spacing, click on the HOME tab, and locate the Paragraph icon group on the ribbon menu.

Figure 7-2
Step 2. Click on the Line and Paragraph Spacing icon to reveal the drop-down menu. You may either select from the preset options Word provides for line spacing, or you can select Line Spacing Options to add your own custom spacing (see Fig. 7-3 below).

Figure 7-3
If you choose to enter your own custom specifications for line spacing, the Paragraph option window will appear (you may also access this window at any time by clicking on the  icon under the Paragraph icon group in the ribbon menu). Once you have finished entering your custom settings, click the OK button.
Note. If you are formatting already existing text, the changes in line spacing will only affect the paragraph in which the cursor falls. The other paragraphs will be unaffected. In order for the new settings to take effect throughout the entire document, all the text you wish to change must be selected. A quick way to select all the text in your document is to hold down the Ctrl key and press A, before changing the line spacing. Note also, that if you change the spacing, the settings you specify will remain the same as you compose the document.
Changing Paragraph Spacing

Figure 7-4
Step 1. To change the paragraph spacing, click on the DESIGN tab above the icons on the ribbon menu. Then, locate the Paragraph Spacing icon at the top right of your screen.
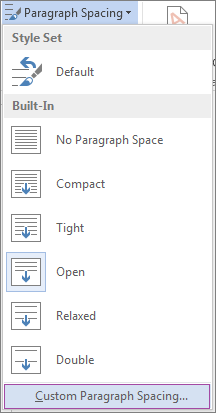
Figure 7-5
Step 2. Click on the Paragraph Spacing icon to reveal the drop-down menu. As with line spacing above, you may either select from the preset options Word provides for paragraph spacing, or you can select Custom Paragraph Spacing (see Fig. 7-6 below).
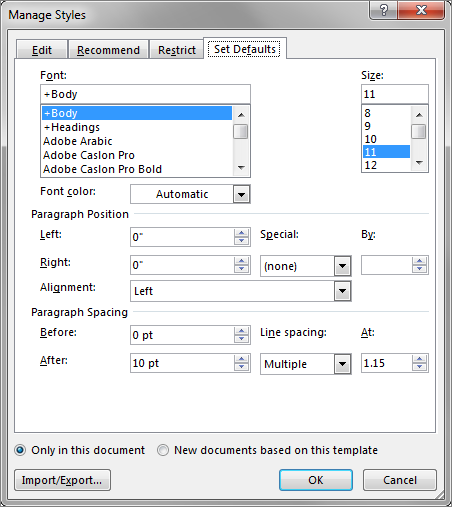
Figure 7-6
If you opt to specify your own paragraph spacing, the Manage Styles window will appear. Here you can not only change the spacing of the paragraphs selected, but also their position. When you are finished, click the OK button.
Indentation
When writing a paper or composing an outline, it will be necessary to make use of indentation. Fortunately, Word 2013 makes this fairly simple, and there are actually multiple ways that you can change the indentation in your document.
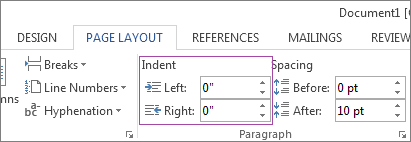
Figure 7-7
The fastest way is to click on the PAGE LAYOUT tab, where you will see the Indentation options just below the tab itself (from here, you can also quickly change the paragraph spacing).
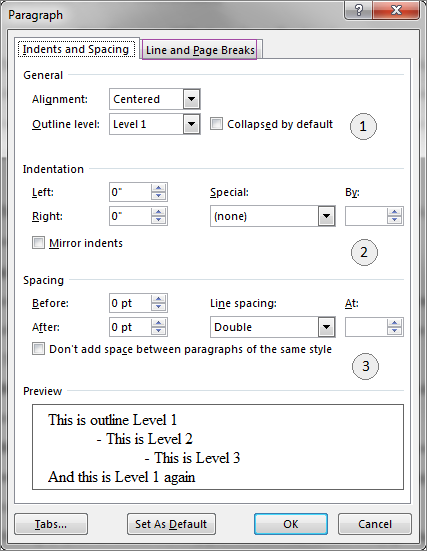
Figure 7-8
Another way to manage your indentation is to click on the on the  icon under the Paragraph icon group in the ribbon menu (see Fig. 7-3 above). This will bring up the Paragraph window, where you can specify your own custom indentation.
1. If you are writing an outline, you can also change your outline level from this window under the General set of options at the top.
2. Under Indentation, you can set how many inches from the left or right margin you would like to indent your paragraph. It is important to remember that the left and right indentation settings affect the entire paragraph, and not simply the first line. If you only want to adjust the first line and have what is called a hanging indentation, refer to the next section (Section 8: Tabs).
3. Under Spacing, the Before and After fields specify how much space will go before and after each paragraph. Beside it, you can also adjust your line spacing.
Paragraph Arrangement
The settings under Line and Page Breaks accessed from the Paragraph window (see Fig. 7-8 above) control pagination, which is how the text of the paragraph or paragraphs selected are arranged within the document. Below is a brief overview of what each of these functions do.
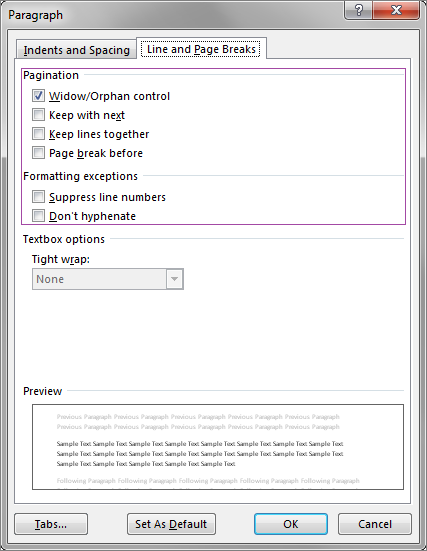
Figure 7-9
Window/Orphan control. When selected, this option prevents a paragraph from leaving only one line on the previous page (known as a "widow" in word processing terminology), as well as prevents only one line from spilling over onto the next page (known as an "orphan").
Keep with next. This setting is useful when utilizing paragraph headers. It keeps the selected text on the same page as the paragraph that follows it. This means that if you highlight a paragraph header, and select this option, the header and the paragraph to which it belongs will always stay together one the same page.
Keep lines together. This setting performs a similar function to Keep with next, except instead of keeping two or more paragraphs on the same page, it keeps two or more lines on the same page.
Page break before. This setting inserts a standard page break before the current position of the cursor. To learn more about inserting breaks, see Section 3: Page and Section Breaks.
The next two settings specify formatting exceptions:
Suppress line numbers. If your document has been set up to display line numbers (i.e., as you would find in a play, poem, philosophical work, or a sacred text), this setting suppresses that function for the selected paragraph.
Don't hyphenate. This setting is particularly useful if your document uses the justified paragraph alignment, as when using this particular alignment, Word automatically hyphenates some words when they spill over to the next line. Selecting this option will disable automatic hyphenation.
Formatting Marks
To aid you in formatting paragraphs, you can enable the display of certain formatting marks (see Fig. 7-10 below).

Figure 7-10
The different formatting marks reveal the presence of tabs (→), regular spaces (.), paragraphs (¶), hidden text, and optional hyphens.

Figure 7-11
To use the formatting marks function in your document, click on the HOME tab above the icons on the ribbon menu, and select Show/Hide Paragraph Marks under the Paragraph group of icons. Note that these marks will not appear on your document upon printing.
[Back to Top]