Microsoft Word 2013 Tutorial
Paragraphs/Headings | Tutorial Main Menu | Training Homepage | Bullets/Numbering
Section 8: Indents and Tabs
Tabs and indentations are both important features in Microsoft Word 2013. In this section, we will cover how to set them both.
Indentations
Activating the Ruler
The most efficient way to both view and set indentations is by use of the Word 2013 ruler feature.

Figure 8-1
In order to use the ruler feature, it must first appear on your screen. To activate it, click on the VIEW tab on the ribbon menu. Then locate the Show icon group on the left, and select the Ruler check box.

Figure 8-2
Now that the ruler appears on your screen, you will notice that at each end of the ruler, there is a gray area delineated by four sliders: three on the left, and one on the right (see Fig. 8-2 above). One of them is a rectangle, while the other three are triangles. The sliders that adjust indentation are the three on the left. These will be referred to as indents. The first indent (1) is a first line indent, the second (2) a hanging indent, and the third (3) a left indent.
Note. In order for the indentations to affect more than one paragraph, the paragraphs in question must be selected before making any adjustments.
Setting a First-Line Indentation

Figure 8-3
The top triangular indent sets the indentation for the first line of the paragraph. To adjust it, click and hold the left mouse button on it, and drag it to the desired location. When finished, simply release the mouse button.
Setting a Hanging Indentation

Figure 8-4
The middle triangular indent sets the indentation for the lines which come after the first in the paragraph. As with the first-line indent above, simply click and drag it to make a hanging indent.
Note. If you want to move the hanging indent back to the left again, you must slide the middle, triangular indent, not the rectangular indent directly below it. If you use the bottom, rectangular indent, Word will automatically push the top triangular indent further to the left along with it (see Fig. 8-4a below).

Figure 8-4a
Setting a Left Indentation

Figure 8-5
The bottom, rectangular indent sets the left indentation for the whole paragraph (or paragraphs, if selected).
Tabs
By default Microsoft Word 2013 sets tabs every half an inch (i.e., each time you press the Tab key, it will move the cursor .5 in. to the right). If needed, however, you may specify your own. Again, the easiest way to do this is to use the ruler function (if your ruler is not visible, refer to Fig. 8-1 at the top of the page).
Setting Tabs

Figure 8-6
To set a custom tab, simply click on the ruler, and hold down the left mouse button, dragging the  to wherever on the ruler you would like it to be. You may set as many tabs as you like, such that whenever you press the Tab key, the cursor will move to the next on the ruler. If you accidentally set a tab or tabs that you did not want, press Ctrl + Z to undo the action(s).
Clearing Tabs
Although custom tabs can be a convenient feature, it often happens that there are simply too many of them, or it is necessary to clear them all and start again.

Figure 8-7
Step 1. To clear tabs, first select the HOME tab on the ribbon menu, and then click on the  icon under the Paragraph icon group.

Figure 8-8
Step 2. When the Paragraph window appears, click on Tabs in the bottom left-hand corner.

Figure 8-9
Step 3. The Tabs window will now appear. If you would like to delete individual tabs, select them in the box to the left, and then click Clear. If you want to delete all the tabs, click on Clear All. When you're finished, click OK.
Creating Leaders
A leader is very helpful when writing a dissertation or book with a table of contents. In between the chapter title on the left side of the page, and the page number on the right side, Word will enter a series of dots. This makes having a professional-looking title page much easier, as it saves you from having to enter all the leaders in manually, which can take quite some time.

Figure 8-10
Step 1. To insert leaders, first format the top of you title page, and then type in the title of the first chapter. Then, click the place on the ruler where you want your tab to be (or, click and then drag it to the desired location).
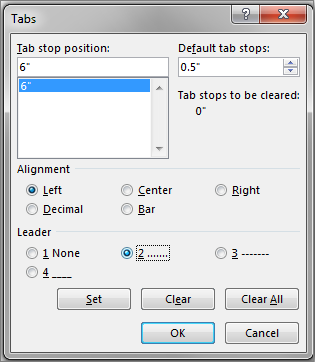
Figure 8-11
Step 2. Then click on the HOME tab on the ribbon menu, and select the icon under the Paragraph icon group (see Fig. 8-7 above). When the Paragraph window appears, click on Tabs (see Fig. 8-8 above). In the Tabs window, select the tab that you created in the previous step. Under Leader, select which leader you would like (for the purpose of this tutorial, we will use option 2). Then, click OK.

Figure 8-12
Step 3. Click the Tab key to insert the leader, and then enter the page number of the first chapter.
Now when you press Enter, you will be able to continue to enter chapter headings, click Tab, and then enter the page numbers (see Fig. 8-13 below). When finished, simply access the Tab window again, and select None under Leaders (see Fig. 8-7, 8-8, and 8-9 above).

Fig. 8-13